30 January, 2009

Imagemagick Kung-Fu

ImageMagick is a suite of image manipulation utilities used to create, edit and convert virtually every popular image file format in existence.

We've recently found ImageMagick useful in generating slide and video presentations for our current program. I'll identify some of the features we've found useful in our trials.

Resizing Images
For presentations it's often useful to resize various original images to a consistent image dimension. To convert the Black Ice album cover image with dimensions of 1007x918, to a dimension of 640x480 use the following command.


$ convert -resize 640x480 ./blackIce-1007x918.jpg /tmp/image.jpg

It's worth noting that during the resizing of the image the aspect ratio of the source image is preserved. As a result, the dimensions of the destination image may differ from (but will be no larger than) the specified 640x480 dimension. In this instance to achieve a 640x480 image, the width reduction ratio of 1007/640 = 1.5734375 and height reduction ratio of 918/480 = 1.9125 the resizing uses the larger reduction ratio of 1.9125. The dimensions of the destination image results in 527x480 (1007/1.9125)x(918/1.9125).

Rotating Images

$ convert -rotate 45 ./blackIce-1007x918.jpg /tmp/image.jpg


Overlaying Images
Overlaying images to create a composite image is useful in presenting two perspectives simultaneously. The ordering of source images is relevant, specified in a bottom-to-top ordering. For instance, we can overlay an image of Angus and Brian over the Black Ice cover by specifying:


$ convert -composite ./blackIce-1007x918.jpg ./acdc-560x395.jpg /tmp/image.jpg

The resultant image consists of a composite image achieved by overlaying Brian and Angus over the Black Ice cover. It's important to specify the larger of the images as the bottom image, otherwise no overlay will result and you'll get a copy of the top image cropped to the size of the bottom image.


The gravity feature defines where the image will be overlayed on the background image. NorthWest, North, NorthEast, West, Center, East, SouthWest and SouthEast are the available gravity types. Unless specified the default gravity used is NorthWest. Examples of North gravity and SouthWest follow.

$ convert -gravity North -composite ./blackIce-1007x918.jpg ./acdc-560x395.jpg /tmp/image.jpg


$ convert -gravity SouthWest -composite ./blackIce-1007x918.jpg ./acdc-560x395.jpg /tmp/image.jpg


You have even greater control specifying an exact overlay position with the -geometry feature. For example, you can position the overlayed image at x position 200, y position 40 by specifying:

$ convert ./blackIce-1007x918.jpg ./acdc-560x395.jpg -geometry +200+40 -composite /tmp/image.jpg


Blending Images
You can blend two images together, giving an almost transparent overlay by using the composite command. For instance, you can blend Angus and Brian with the Black Ice label using the command:


$ composite -blend 50 ./acdc-560x395.jpg ./blackIce-1007x918.jpg -geometry +10+0 /tmp/image.jpg


$ composite -blend 50 ./blackIce-1007x918.jpg ./acdc-560x395.jpg -geometry +10+0 /tmp/image.jpg


Stretching both images to a known dimension of 1007x918 gives a more uniform overlay of both images.


$ composite -blend 50 ./acdc-560x395.jpg ./blackIce-1007x918.jpg -geometry +10+0 -resize 1007x918 /tmp/image.jpg


The top image is resized to the underlying image, so if the underlying image is larger the top image is stretched to fit. If, however, the top image is larger than the underlying image the top image is cropped to the dimensions of the underlying image.

Now, young warrior, take these weapons to the masses.
29 January, 2009

Linux Kernel Modules

We've been using Firewire to stream pre-captured video streams from a PC to a TI DSP as of late. We were witnessing some instabilities today and on examing the syslogd found a recommendation to disable serialize_io for the sdp module.

I've complained before about out companies Internet firewall and preventing us from visiting blogs, and a number of useful sites. This made finding how to pass an argument to a module during start-up difficult, 'til I came home. Then....behold, the power of the Internet!

Kernel Modules

25 January, 2009

Geek HotRod

When I was a younger, cooler man I had a 1971 Chevy Nova, night black, with a 350 L2 Holley 650 four barrel and Edelbrock intake. She did 12 sec quarters without posi and in street treads. If I'm honest, I bought her mechanically complete although I upgrades some of her interior and lifted the back for a more bad-ass look.

If I still had her, I expect I'd spend less time, but more money on her and the subject of this post would consist of identifying her upgrades and timings. More than likely she'd live today with a 671 blower, tubbed, and a Holley 750 four barrel. Alas, her days were numbered the day that this irresponsible kid possessed her. She lived a short illustrious career in the hands of this kid, going through set upon set of tires and if I'm honest, never followed through on her original intention...getting me laid :)

Alas, I no longer have her so I'll target a far less cool subject...my current Linux workstation.

I started with a Xion II enclosure paired with a Gigabyte GA-EP43-DS3L/S3L motherboard an Intel Core 2 Duo 3Ghz processor with 4Gb of Corsair XNS2 DDR2 memory and a Diamond Radeon HD 3450 graphics card.

I've become a Debian convert some 2 years ago, but this was my first encounter installing a 64bit Operating System. I'm documenting my initial system setup for fun.

I installed Debian 4.0 R6 AMD64 distribution (Etch) in anticipation for the Lenny distro but I'm rather conservative in terms of my distributions as they are the lifeblood of my career and unlike others, I'm not much for bleeding edge. My loyalty to Debian is due to their conservative distributions and have not encountered unstable distributions except when installing their non-stable versions.

I went through the normal installation procedure using the NetInstall distro. The focus of this machine will aimed at hosting a number of virtual machines using VmWare server 2.0 whose installation will be identified later in this post.

Sound
After the installation has completed, I noted that the sound indicator on the desktop panel implied muted. I resolved by running alsamixer and adjusting the sound levels accordingly.

$ alsamixer


Default Panel Icons
I prefer iceweasel over epiphany as a web browser, so I removed Epiphany from the panel and replaced with IceWeasel. Additionally, i updated the default web browser to IceWeasel by selecting Desktop->Preferred Applications and selected IceWeasel as my default web browser. If you don't do this, opening a system call to open a web page will use epiphany...for example VmWare server console.

Playing Encrypted Dvd
You'll find that at this point attempting to play encrypted dvds with totem will fail. You need to install libdvdcss2, which is an unofficial package you won't find in without specifying an unofficial source. Install it by doing the following:


# vi /et/apt/sources.list

Add lines:
deb http://ftpdebian-unofficial.org/debian etc main contrib non-free restricted
deb-src http://ftpdebian-unofficial.org/debian etc main contrib non-free restricted


# apt-get update
# apt-get install libdvdcss2


You'll now find that you can play encrypted dvds.

Flash Player Installation
Youtube, what exactly can you say about Youtube? Really, how did we ever live without it? Well, if you don't install FlashPlayer you'll have to learn to live without it. Otherwise, follow these installation procedures.

Mplayer Installation
I use mplayer to view raw video streams, can't seem to do without it. Install it by:

# apt-get install mplayer mplayer-doc


VmWare Server 2.0 Installation
  • Download VMware-server-2.0.0-122956.x86_64.tar.gz from www.vmware.com.
  • Acquire the license key by registering with them.
  • Install the required packages:


# apt-get install gcc linux-headers-`uname -r` build-essentials

  • Untar the archive as root and run vmware-install.pl and follow the instructions.
Samba Installation/Setup
I use samba to connect to the host home directories from WinXp VM's. As a result, I need Samba to be installed and configured on the host. I did so by:

# apt-get install samba
# vi /etc/samba/smb.conf

Modify the [home] writable field to yes.

# smbpasswd -a user1

To register the samba user and specify the password for connecting to the user's home directory.

11 January, 2009

Vmware Server 2.0 - VNC Connection

I have VMWare Server 2.0 installed on my Debian machine. I've really been pleased with the performance and flexibility having finally rid myself of a Windows partition (dual-boot) and the need for a Windows-dedicated machine.

While I am impressed with the web-based console interface I have been investigating using VNC as the user interface for work-specific reasons I won't go into. After journeying to the mountain-top of Google I found numerous posting of how to enable the integrated VNC interfacing for VmWare, but found that the referenced posting were a bit vague and in the worst case having typos that resulted in my wondering why it wasn't working. I'll attempt to document how I set up VNC connectivity in detail.

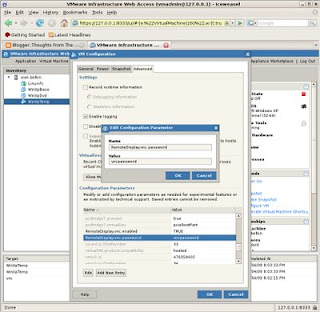
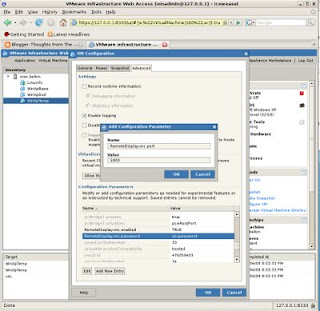
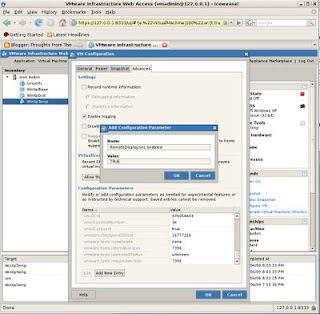
Open the virtual machine and under the Summary tab select Configure VM. You will need to enable VNC connectivity by adding 3 new entries:
  • RemoteDisplay.vnc.enabled = TRUE
  • RemoteDisplay.vnc.password = vncpassword
  • RemoteDisplay.vnc.port = 5900

You can do this through the Advanced tab as follows:


Continue by starting the virtual machine and verifying no errors were detected by examining the Events log. As I hinted earlier, I spent some hours trying to figure out why the VNC connection wasn't working after copying verbatim instructions from a web posting only to find that the web post had a typo. I finally found this by examining the event log.

Now, all you need to do is connect to the VmWare server at the defined port.

I installed xvncviewer on my Debian machine:

# apt-get install xvncviewer
# exit
$ vncviewer 192.168.2.12:5900


Results in:


It's important to understand that you aren't connecting to the VM itself, rather you are connecting to the VmWare Server. Notice that I am running VmWare Server on 192.168.2.12, the same machine I am running vncviewer on, and the VM is configured as 192.168.2.9. The VNC connection is established with 192.168.2.12:5900, the VmWare server ip and port number added for the WinXpTemp VM.

You could extend on this by configuring port 5901 for another VM and so on, connecting uniquely to each VM with by the unique port id.

Happy playing.

07 January, 2009

The Human Voice

I overheard a conversation between two colleagues, one of which I have never met before. What became apparent during the course of the conversation was the nasally voice the one gentleman had, kinda Ray Barron'ish, only a bit higher. I found it unexpected given the man was of average build/height.

I began thinking, is a person's speaking voice a product of their environment or genetics. Surely there are elements of speaking that are learned, namely command of presence, speaking with authority and projection. But what of the other vocal properties? It isn't hard to imagine limiting factors of an poor vocal product, we've all been at a meeting/presentation of a speaker with a distracting voice. Albert Einstein himself wouldn't be taken seriously if he sounded like Shirley Temple.

As a parent, can you prevent your kid from developing a poor voice. Can you beat them early and often enough, training them into a better voice that will one day command a presence in any room they enter?

06 January, 2009

Bubble Gum Engineering

A few years back I worked for a defense contractor that suffered from what I call "bubble gum engineering".

Our program was complex, a mission-critical self-propelled fully automated weapon system, and taming that complexity with a compressed schedule was a challenge, but one that we capable of addressing. What made the program more challenging than it needed to be was the fact that some of our software managers would take business trips across the country for meetings, and this gave them opportunities to sit next to anonymous vendors peddling their 'wares' and ample time to read up on the new 'sexy' methodologies. They'd drink in the articles or vendor solicitations with wide eyes and eager wallets only to bring back these 'snake oils' announced by a routine all-hands meeting.

Off we'd go with a dramatic change of direction, fast-n-furious with new training, new procedures, and new development mechanisms! Then, shortly after we'd settle in on the new methodology the bubble gum had lost it's flavor to our managers, who'd replace it with the even newer methodology/technique acquired on their last business trip.

Time-after-time we'd be directed a change of course, time-after-time we'd accept these new challenges with depleting zeal slowly chipping away at our schedule, our software stability, and our morale.

I've learned through these challenging trials that there is a limit to reducing the complexity of a problem. Fact is, the problem space of a program defines the minimal complexity of the system, however there is no limit (read that as infinite) to the addition of added complexity. You can take a moderately difficult problem and make it infinitely complex. That is the lesson I learned from that experience anyway.

04 January, 2009

Cd Db Fun

$ cd-discid /dev/cdrom1 | cut -f 1 -d \
da0bee10

$ cddbcmd cddb read soundtrack da0bee10

$ id3 -l ~/ogg/someAlbum/someTrack.mp3

$ id3v2 --delete-all << removes id3v1 & id3v2 tags, otherwise some apps may rely on them be default and ignore your changes


03 January, 2009

More Video Editing Ninja Moves with Linux

Generate uncompressed video from raw YUV stream.

$ ffmpeg -vcodec rawvideo -i input.yuv output.avi


Copy clip of video source.

$ mencoder input.avi -o output.avi -ovc copy -ss 1 -endpos 10


Convert to uncompressed raw video stream.

$ mencoder input.avi -ovc raw -of rawvideo -o output.avi


Downsample high quality video to grayscale.

$ mencoder input.avi -o output.avi -fps 30 -ofps 10 -vc scale=640:480 -nosound -ovc lavc -lavcopts vcodec=wmv2:gray


Conversion to Ogg/Theora container/codec:

$ ffmpeg2theora –videoquality 10 ./source.avi -o outVideo.ogg