Xen Installation
This installation took place on a Debian 4.0 AMD 64 distribution, with VT-X hardware support:
user@debian:~$ cat /proc/cpuinfo
processor       : 0
vendor_id       : GenuineIntel
cpu family      : 6
model           : 15
model name      : Intel(R) Core(TM)2 CPU         L7400  @ 1.50GHz
stepping        : 6
cpu MHz         : 1234.565
cache size      : 4096 KB
physical id     : 0
siblings        : 1
core id         : 0
cpu cores       : 1
fpu             : yes
fpu_exception   : yes
cpuid level     : 10
wp              : yes
flags           : fpu tsc msr pae mce cx8 apic mtrr mca cmov pat pse36 clflush dts acpi mmx fxsr sse sse2 ss ht tm syscall nx lm constant_tsc pni monitor ds_cpl vmx est tm2 cx16 xtpr lahf_lm
bogomips        : 3180.78
clflush size    : 64
cache_alignment : 64
address sizes   : 36 bits physical, 48 bits virtual
power management:

processor       : 1
vendor_id       : GenuineIntel
cpu family      : 6
model           : 15
model name      : Intel(R) Core(TM)2 CPU         L7400  @ 1.50GHz
stepping        : 6
cpu MHz         : 1234.565
cache size      : 4096 KB
physical id     : 1
siblings        : 1
core id         : 0
cpu cores       : 1
fpu             : yes
fpu_exception   : yes
cpuid level     : 10
wp              : yes
flags           : fpu tsc msr pae mce cx8 apic mtrr mca cmov pat pse36 clflush dts acpi mmx fxsr sse sse2 ss ht tm syscall nx lm constant_tsc pni monitor ds_cpl vmx est tm2 cx16 xtpr lahf_lm
bogomips        : 3180.78
clflush size    : 64
cache_alignment : 64
address sizes   : 36 bits physical, 48 bits virtual
power management:
user@debian:~$ egrep '^flags.*(vmx|svm)' /proc/cpuinfo
flags           : fpu tsc msr pae mce cx8 apic mtrr mca cmov pat pse36 clflush dts acpi mmx fxsr sse sse2 ss ht tm syscall nx lm constant_tsc pni monitor ds_cpl vmx est tm2 cx16 xtpr lahf_lm
flags           : fpu tsc msr pae mce cx8 apic mtrr mca cmov pat pse36 clflush dts acpi mmx fxsr sse sse2 ss ht tm syscall nx lm constant_tsc pni monitor ds_cpl vmx est tm2 cx16 xtpr lahf_lm
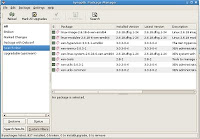
Our journey begins by installing the appropriate Xen Debian packages using Synaptic; following is a screen shot of the packages I installed.

Install the above packages using Synaptic or apt-get; whichever you prefer.
After completing the installation of these packages, you'll need to reboot. You'll find that a new Xen-based kernel image has been installed and should be defined as the default boot image. You'll notice that some Xen-specific logging prior to the Linux boot sequence. After completion, you should boot to a familiar looking system....login prompt and similar desktop as you've grown to love.
WinXp Guest Installation
You should now be ready to install your first guest operating system. Xen refers to these as domains...really don't care as every other virtualization technology calls them virtual machines and I'll be sticking with that terminology.
If you're familiar with VirtualBox, or VMware you'll quickly notice that Xen configuration is less user-friendly. Gone are the GUI configuration utilities, gone are the virtual machine status displays, and gone are the single-click access to virtual machine consoles. No worries though, we'll work with what the good Xen developers gave us.
Guest OS Installation Media
The installation procedures I referenced made use of an ISO image of the WinXp installation cd. How exactly you'd do this with live media is left as an exercise to the reader :)
I created a raw copy of the WinXp Installation CD by using the dd utility as follows:
Note, you must unmount the cdrom BEFORE issuing this command.
$ dd if=/dev/scd0 of=/home/user/WinXpPro.iso
Creation of the Virtual Machine Hard-Drive File System
# mkdir /home/xen/domains/win01
# dd if=/dev/zero of=/home/xen/domains/win01/win_vm.img bs=1M count=2048
Creation of Virtual Machine Configuration File
While the user-friendly configuration user interfaces are non-existant, you still have available a highly configurable virtual machine. Configuration is done by a text based configuration file that you must create prior to starting the machine. I used the following for my WinXp guest operating system installation. You'll need to create this as root in the specified directory.
debian:~# cat /etc/xen/win01.cfg
kernel = '/usr/lib/xen-3.0.3-1/boot/hvmloader'
builder = 'hvm'
memory = '1024'
device_model='/usr/lib/xen-3.0.3-1/bin/qemu-dm'

# Disks
disk = [ 'file:/home/xen/domains/win01/win_vm.img,ioemu:hda,w',
'file:/home/user/WinXpPro.iso,ioemu:hdc:cdrom,r' ]

# Hostname
name='win01'

# Networking
vif = ['type=ioemu, bridge=xenbr0']

# Behaviour
boot='d'
vnc=1
vncviewer=1
vncunused=0
sdl=0
debian:~#
Note, that the disk field specifies a hard-drive file system image and the OS installation ISO image. First time booting of this VM will kick off the installation from the ISO image.
Booting the VM
You should now be ready to start the VM. You start (or create) the VM by issuing the following command:
# xen create win01.cfg -c
Pay special attention to the -c argument, otherwise this thing may fail silently. You should get a started win01
response from this command.
You next need to know how to query the status of the VM and connect to the VM console. You can query the status of running virtual machines by issuing the command:
debian:~# xm list
Name                                      ID Mem(MiB) VCPUs State   Time(s)
Domain-0                                   0      947     2 r-----    457.1
win01                                      3     1024     1 -b----     17.6
debian:~#
This status tells you general info, but at this point you want to pay special attention to the ID as it is how you will connect to the VM.
VNC is integrated into Xen VMs and this is the means to connect to the machine. The VM ID indirectly tells you what port to connect to (by adding 5900+ID). You can connect to this machine by issuing:
$user@debian:~$ vncviewer 127.0.0.1:5903
During the installation process the machine reboots a couple times, each time a new ID is assigned so when you lose your connection repeat the xm list + vncviewer sequence again.
That's all for now.
No comments:
Post a Comment