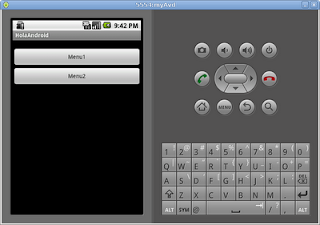
Let's expand our example to include a sub-menu system. First, add the additional menu button to the res/layout/main.xml file as follows:
user@River:~/HolaAndroid$ cat -n res/layout/main.xml
<?xml version="1.0" encoding="utf-8"?>
<LinearLayout xmlns:android="http://schemas.android.com/apk/res/android"
android:orientation="vertical"
android:layout_width="fill_parent"
android:layout_height="fill_parent"
>
<TextView
android:layout_width="fill_parent"
android:layout_height="wrap_content"
/>
<Button android:id="@+id/button1"
android:layout_width="fill_parent"
android:layout_height="wrap_content"
android:layout_alignParentBottom="true"
android:text="Menu1" />
<Button android:id="@+id/button2"
android:layout_width="fill_parent"
android:layout_height="wrap_content"
android:layout_alignParentBottom="true"
android:text="Menu2" />
</LinearLayout>
Rebuilding and running and you'll get twin menu buttons, the first bound to quitting the application, the second unbound to any action.

Next, we need to bind the pressing of button 2 to an action, namely the creation and rendering of another submenu.
Let's contain the behaviors of the second menu button to a newly defined class, as follows:
user@River:~/HolaAndroid$ cat src/com/example/holaandroid/Menu2.java
package com.example.holaandroid;

import com.example.holaandroid.R;

import android.app.Activity;
import android.database.Cursor;
import android.os.Bundle;
import android.view.View;
import android.widget.Button;
import android.widget.EditText;

public class Menu2 extends Activity {
private Button addButton;
   @Override
   protected void onCreate(Bundle savedInstanceState) {
       super.onCreate(savedInstanceState);
       setContentView(R.layout.menu2);
       addButton = (Button)this.findViewById(R.id.m2_button1);
   }
}
Easy thing to forget, but now that we're introducing a new Activity you must define it in the manifest (line 14).
$ user@River:~HolaAndroid$ cat AndroidManifest.xml
1    <?xml version="1.0" encoding="utf-8"?>
2    <manifest xmlns:android="http://schemas.android.com/apk/res/android"
3          package="com.example.holaandroid"
4          android:versionCode="1"
5          android:versionName="1.0">
6        <application android:label="@string/app_name">
7            <activity android:name=".HolaAndroid"
8                      android:label="@string/app_name">
9                <intent-filter>
10                    <action android:name="android.intent.action.MAIN" />
11                    <category android:name="android.intent.category.LAUNCHER" />
12                </intent-filter>
13            </activity>
14            <activity android:name=".Menu2"/>
15        </application>
16    </manifest>
Since we're referencing a button in our source code, we need to have it defined in our layout xml. Create a new XML file which defines our button as follows:
user@River:~/HolaAndroid$ cat res/layout/menu2.xml
<?xml version="1.0" encoding="utf-8"?>

<LinearLayout xmlns:android="http://schemas.android.com/apk/res/android"
android:orientation="vertical" android:layout_width="fill_parent"
android:layout_height="fill_parent">
<Button android:text="M2.Button1"
android:id="@+id/m2_button1"
android:layout_width="fill_parent"
android:layout_height="wrap_content"
android:layout_alignParentBottom ="true"/>
</LinearLayout>
The final main class follows, the updates include importing the newly relevant packages, creating a createMenu2() method and assigning the main menu button click to the generation of the submenu (lines 9-12, 18, 36-43 & 45-52).
user@River:~/HolaAndroid$ cat -n src/com/example/holaandroid/HolaAndroid.java
    1 package com.example.holaandroid;
    2
    3 import android.app.Activity;
    4 import android.os.Bundle;
    5 import android.widget.Button;
    6 import android.view.View;
    7 import android.view.View.OnClickListener;
    8 import android.util.Log;
    9 import android.content.Intent;
   10 import android.view.Menu;
   11 import android.view.MenuItem;
   12 import android.view.MenuInflater;
   13
   14 public class HolaAndroid extends Activity
   15 {
   16     private static final String ClassName = "HolaAndroid";
   17     private Button b1_;
   18     private Button b2_;
   19
   20     /** Called when the activity is first created. */
   21     @Override
   22     public void onCreate(Bundle savedInstanceState)
   23     {
   24         final String MethodName = "onStart";
   25
   26         super.onCreate(savedInstanceState);
   27         setContentView(R.layout.main);
   28
   29         b1_ = (Button)this.findViewById(R.id.button1);
   30         b1_.setOnClickListener(new OnClickListener() {
   31                 public void onClick (View v){
   32                   Log.d(ClassName+"::"+MethodName, "entry");
   33                   finish();
   34                 }
   35             });
   36         b2_ = (Button)this.findViewById(R.id.button2);
   37         b2_.setOnClickListener(new OnClickListener() {
   38                 public void onClick (View v){
   39                   Log.d(ClassName+"::"+MethodName, "entry");
   40                   createMenu2();
   41                   Log.d(ClassName+"::"+MethodName, "entry");
   42                 }
   43             });
   44     }
   45     private static final int ACTIVITY_CREATE=0;
   46     private void createMenu2() {
   47       final String MethodName = "createMenu2";
   48       Log.d(ClassName+"::"+MethodName, "entry");
   49       Intent i = new Intent(this, Menu2.class);
   50       startActivityForResult(i, ACTIVITY_CREATE);
   51       Log.d(ClassName+"::"+MethodName, "exit");
   52     }
   53
   54 }
While you're still in a similar predicament as our previous post, namely a submenu button with no action defined, you can navigate to/from the submenu using the main button and the back keypad button.
Cheers.
No comments:
Post a Comment