10 October, 2010

Hola Android -- Stage 4

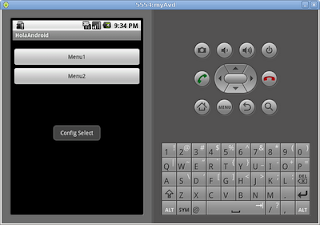
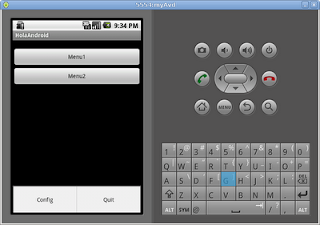
Let's expand on our user interface example by incorporating an 'icon menu' on the main activity. This menu will be activated upon pressing the 'menu button'.

Unlike the incorporation of previous menus, this addition will take place exclusively in the main activity.

We start by defining the menu items in a resource layout XML file as follows:

user@River:~/HolaAndroid$ cat -n res/layout/iconmenu.xml
1    <?xml version="1.0" encoding="utf-8"?>
2    <menu xmlns:android="http://schemas.android.com/apk/res/android">
3        <item android:id="@+id/config"
4              android:title="Config" />
5        <item android:id="@+id/quit"
6              android:title="Quit" />
7    </menu>
8
user@River:~/HolaAndroid$


Next, we modify our HolaAndroid.java source to include the rendering of the menu upon pressing the menu button. We're making use of the Toast utilities to demonstrate the button press. Specifically, lines 13-14 and 57-99 were introduced to get our desired behavior.


user@River:~/HolaAndroid$ cat -n src/com/example/holaandroid/HolaAndroid.java
    1 package com.example.holaandroid;
    2 
    3 import android.app.Activity;
    4 import android.os.Bundle;
    5 import android.widget.Button;
    6 import android.view.View;
    7 import android.view.View.OnClickListener;
    8 import android.util.Log;
    9 import android.content.Intent;
   10 import android.view.Menu;
   11 import android.view.MenuItem;
   12 import android.view.MenuInflater;
   13 import android.widget.Toast;
   14 import android.view.Gravity;
   15 
   16 
   17 public class HolaAndroid extends Activity
   18 {
   19     private static final String ClassName = "HolaAndroid";
   20     private Button b1_;
   21     private Button b2_;
   22 
   23     /** Called when the activity is first created. */
   24     @Override
   25     public void onCreate(Bundle savedInstanceState)
   26     {
   27         final String MethodName = "onStart";
   28 
   29         super.onCreate(savedInstanceState);
   30         setContentView(R.layout.main);
   31 
   32         b1_ = (Button)this.findViewById(R.id.button1);
   33         b1_.setOnClickListener(new OnClickListener() {
   34                 public void onClick (View v){
   35                   Log.d(ClassName+"::"+MethodName, "entry");
   36                   finish();
   37                 }
   38             });
   39         b2_ = (Button)this.findViewById(R.id.button2);
   40         b2_.setOnClickListener(new OnClickListener() {
   41                 public void onClick (View v){
   42                   Log.d(ClassName+"::"+MethodName, "entry");
   43                   createMenu2();
   44                   Log.d(ClassName+"::"+MethodName, "entry");
   45                 }
   46             });
   47     }
   48     private static final int ACTIVITY_CREATE=0;
   49     private void createMenu2() {
   50       final String MethodName = "createMenu2";
   51       Log.d(ClassName+"::"+MethodName, "entry");
   52       Intent i = new Intent(this, Menu2.class);
   53       startActivityForResult(i, ACTIVITY_CREATE);
   54       Log.d(ClassName+"::"+MethodName, "exit");
   55     }
   56 
   57     @Override
   58     public boolean onCreateOptionsMenu(Menu menu)
   59     {
   60         final String MethodName = "onCreateOptionsMenu";
   61         Log.d(ClassName+"::"+MethodName, "entry");
   62         MenuInflater inflater = getMenuInflater();
   63         inflater.inflate(R.layout.iconmenu, menu);
   64         Log.d(ClassName+"::"+MethodName, "exit");
   65         return true;
   66     }
   67 
   68     @Override
   69     public boolean onOptionsItemSelected(MenuItem item)
   70     {
   71         final String MethodName = "onOptionsItemSelected";
   72         Log.d(ClassName+"::"+MethodName, "entry");
   73         boolean retVal=false;
   74         switch (item.getItemId()) {
   75           case R.id.config:
   76               retVal=true;
   77               showMsg("Config Select");
   78             break;
   79           case R.id.quit:
   80               retVal=true;
   81               showMsg("Quit Select");
   82               finish();
   83             break;
   84         default:
   85           retVal=super.onOptionsItemSelected(item);
   86         }
   87         Log.d(ClassName+"::"+MethodName, "exit");
   88         return retVal;
   89     }
   90 
   91     private void showMsg(String msg) {
   92       final String MethodName = "showMsg";
   93       Log.d(ClassName+"::"+MethodName, "entry");
   94       Toast toast = Toast.makeText(this, msg, Toast.LENGTH_LONG);
   95       toast.setGravity(Gravity.CENTER, toast.getXOffset() / 2, toast.getYOffset() / 2);
   96       toast.show();
   97       Log.d(ClassName+"::"+MethodName, "exit");
   98     }
   99 
  100 }
user@River:~/HolaAndroid$


Make it, and run it and you'll get the following result.


07 October, 2010

Hola Android -- Stage 3

So far, we've created the equivalent of a 'Hello World' application, extended the UI to include a menu button, and bound an action with the pressing of the menu button.

Let's expand our example to include a sub-menu system. First, add the additional menu button to the res/layout/main.xml file as follows:


user@River:~/HolaAndroid$ cat -n res/layout/main.xml
<?xml version="1.0" encoding="utf-8"?>
<LinearLayout xmlns:android="http://schemas.android.com/apk/res/android"
android:orientation="vertical"
android:layout_width="fill_parent"
android:layout_height="fill_parent"
>
<TextView
android:layout_width="fill_parent"
android:layout_height="wrap_content"
/>
<Button android:id="@+id/button1"
android:layout_width="fill_parent"
android:layout_height="wrap_content"
android:layout_alignParentBottom="true"
android:text="Menu1" />
<Button android:id="@+id/button2"
android:layout_width="fill_parent"
android:layout_height="wrap_content"
android:layout_alignParentBottom="true"
android:text="Menu2" />
</LinearLayout>


Rebuilding and running and you'll get twin menu buttons, the first bound to quitting the application, the second unbound to any action.


Next, we need to bind the pressing of button 2 to an action, namely the creation and rendering of another submenu.

Let's contain the behaviors of the second menu button to a newly defined class, as follows:

user@River:~/HolaAndroid$ cat src/com/example/holaandroid/Menu2.java
package com.example.holaandroid;

import com.example.holaandroid.R;

import android.app.Activity;
import android.database.Cursor;
import android.os.Bundle;
import android.view.View;
import android.widget.Button;
import android.widget.EditText;

public class Menu2 extends Activity {
private Button addButton;
@Override
protected void onCreate(Bundle savedInstanceState) {
super.onCreate(savedInstanceState);
setContentView(R.layout.menu2);
addButton = (Button)this.findViewById(R.id.m2_button1);
}
}


Easy thing to forget, but now that we're introducing a new Activity you must define it in the manifest (line 14).

$ user@River:~HolaAndroid$ cat AndroidManifest.xml
1 <?xml version="1.0" encoding="utf-8"?>
2 <manifest xmlns:android="http://schemas.android.com/apk/res/android"
3 package="com.example.holaandroid"
4 android:versionCode="1"
5 android:versionName="1.0">
6 <application android:label="@string/app_name">
7 <activity android:name=".HolaAndroid"
8 android:label="@string/app_name">
9 <intent-filter>
10 <action android:name="android.intent.action.MAIN" />
11 <category android:name="android.intent.category.LAUNCHER" />
12 </intent-filter>
13 </activity>
14 <activity android:name=".Menu2"/>
15 </application>
16 </manifest>


Since we're referencing a button in our source code, we need to have it defined in our layout xml. Create a new XML file which defines our button as follows:

user@River:~/HolaAndroid$ cat res/layout/menu2.xml
<?xml version="1.0" encoding="utf-8"?>

<LinearLayout xmlns:android="http://schemas.android.com/apk/res/android"
android:orientation="vertical" android:layout_width="fill_parent"
android:layout_height="fill_parent">
<Button android:text="M2.Button1"
android:id="@+id/m2_button1"
android:layout_width="fill_parent"
android:layout_height="wrap_content"
android:layout_alignParentBottom ="true"/>
</LinearLayout>


The final main class follows, the updates include importing the newly relevant packages, creating a createMenu2() method and assigning the main menu button click to the generation of the submenu (lines 9-12, 18, 36-43 & 45-52).


user@River:~/HolaAndroid$ cat -n src/com/example/holaandroid/HolaAndroid.java
1 package com.example.holaandroid;
2
3 import android.app.Activity;
4 import android.os.Bundle;
5 import android.widget.Button;
6 import android.view.View;
7 import android.view.View.OnClickListener;
8 import android.util.Log;
9 import android.content.Intent;
10 import android.view.Menu;
11 import android.view.MenuItem;
12 import android.view.MenuInflater;
13
14 public class HolaAndroid extends Activity
15 {
16 private static final String ClassName = "HolaAndroid";
17 private Button b1_;
18 private Button b2_;
19
20 /** Called when the activity is first created. */
21 @Override
22 public void onCreate(Bundle savedInstanceState)
23 {
24 final String MethodName = "onStart";
25
26 super.onCreate(savedInstanceState);
27 setContentView(R.layout.main);
28
29 b1_ = (Button)this.findViewById(R.id.button1);
30 b1_.setOnClickListener(new OnClickListener() {
31 public void onClick (View v){
32 Log.d(ClassName+"::"+MethodName, "entry");
33 finish();
34 }
35 });
36 b2_ = (Button)this.findViewById(R.id.button2);
37 b2_.setOnClickListener(new OnClickListener() {
38 public void onClick (View v){
39 Log.d(ClassName+"::"+MethodName, "entry");
40 createMenu2();
41 Log.d(ClassName+"::"+MethodName, "entry");
42 }
43 });
44 }
45 private static final int ACTIVITY_CREATE=0;
46 private void createMenu2() {
47 final String MethodName = "createMenu2";
48 Log.d(ClassName+"::"+MethodName, "entry");
49 Intent i = new Intent(this, Menu2.class);
50 startActivityForResult(i, ACTIVITY_CREATE);
51 Log.d(ClassName+"::"+MethodName, "exit");
52 }
53
54 }


While you're still in a similar predicament as our previous post, namely a submenu button with no action defined, you can navigate to/from the submenu using the main button and the back keypad button.

Cheers.

05 October, 2010

Hola Android -- Stage 2

Ok, so you've got your first Android application that prints 'Hello World'; nothing to write home about.

Let's expand on it a bit and make use of some of the User Interface capabilities. First though, let's remove the printing of 'Hello World'.

If you search the code you'll find no reference to our elusive string, instead it's hiding in the resources layout definition file res/layout/main.xml.

user@River:~/HolaAndroid$ cat -n res/layout/main.xml
1 <?xml version="1.0" encoding="utf-8"?>
2 <LinearLayout xmlns:android="http://schemas.android.com/apk/res/android"
3 android:orientation="vertical"
4 android:layout_width="fill_parent"
5 android:layout_height="fill_parent"
6 >
7 <TextView
8 android:layout_width="fill_parent"
9 android:layout_height="wrap_content"
10 android:text="Hello World, HolaAndroid"
11 />
12 </LinearLayout>
13
user@River:~/HolaAndroid$


Removing line 10 and you'll now have an application that renders a blank screen. Rebuild and re-run and you'll get:

user@River:~/HolaAndroid$ vi res/layout/main.xml
user@River:~/HolaAndroid$ make
ant debug
Buildfile: build.xml
[setup] Android SDK Tools Revision 6
[setup] Project Target: Android 1.5
[setup] API level: 3
[setup] WARNING: No minSdkVersion value set. Application will install on all Android versions.
[setup] Importing rules file: platforms/android-3/ant/ant_rules_r2.xml

-compile-tested-if-test:

-dirs:
[echo] Creating output directories if needed...

-resource-src:
[echo] Generating R.java / Manifest.java from the resources...

-aidl:
[echo] Compiling aidl files into Java classes...

compile:
[javac] Compiling 1 source file to /home/user/HolaAndroid/bin/classes

-dex:
[echo] Converting compiled files and external libraries into /home/user/HolaAndroid/bin/classes.dex...

-package-resources:
[echo] Packaging resources
[aaptexec] Creating full resource package...

-package-debug-sign:
[apkbuilder] Creating HolaAndroid-debug-unaligned.apk and signing it with a debug key...
[apkbuilder] Using keystore: /home/user/.android/debug.keystore

debug:
[echo] Running zip align on final apk...
[echo] Debug Package: /home/user/HolaAndroid/bin/HolaAndroid-debug.apk

BUILD SUCCESSFUL
Total time: 1 second
user@River:~/HolaAndroid$ make run
adb install -r ./bin/HolaAndroid-debug.apk
97 KB/s (4342 bytes in 0.043s)
pkg: /data/local/tmp/HolaAndroid-debug.apk
Success
adb shell am start -a android.intent.action.HolaAndroid -n com.example.holaandroid/com.example.holaandroid.HolaAndroid
Starting: Intent { act=android.intent.action.HolaAndroid cmp=com.example.holaandroid/.HolaAndroid }
user@River:~/HolaAndroid$


Now, you can play with your screen design by editing the res/layout/main.xml file. Note below we've added lines 11-15 to add a button to the main window.

user@River:~/HolaAndroid$ cat -n res/layout/main.xml
1 <?xml version="1.0" encoding="utf-8"?>
2 <LinearLayout xmlns:android="http://schemas.android.com/apk/res/android"
3 android:orientation="vertical"
4 android:layout_width="fill_parent"
5 android:layout_height="fill_parent"
6 >
7 <TextView
8 android:layout_width="fill_parent"
9 android:layout_height="wrap_content"
10 />
11 <Button android:id="@+id/button1"
12 android:layout_width="fill_parent"
13 android:layout_height="wrap_content"
14 android:layout_alignParentBottom="true"
15 android:text="Menu1" />
16 </LinearLayout>
user@River:~/HolaAndroid$


Rebuild and run and you'll get:


Alas, while you've created a button, the button has no action associated with it. Press it as you'd like you'll never get it to do anything.

So, let's make it do something. In order to tie your newly created button to an action you'll need to edit the src/com/example/holaandroid/HolaAndroid.java source. We'll add a button member, or attribute, and assign an action method to be called on the button click.

Below is our modified source code:

user@River:~/HolaAndroid$ cat -n src/com/example/holaandroid/HolaAndroid.java
1 package com.example.holaandroid;
2
3 import android.app.Activity;
4 import android.os.Bundle;
5 import android.widget.Button;
6 import android.view.View;
7 import android.view.View.OnClickListener;
8 import android.util.Log;
9
10 public class HolaAndroid extends Activity
11 {
12 private static final String ClassName = "HolaAndroid";
13 private Button b1_;
14
15 /** Called when the activity is first created. */
16 @Override
17 public void onCreate(Bundle savedInstanceState)
18 {
19 final String MethodName = "onStart";
20
21 super.onCreate(savedInstanceState);
22 setContentView(R.layout.main);
23
24 b1_ = (Button)this.findViewById(R.id.button1);
25 b1_.setOnClickListener(new OnClickListener() {
26 public void onClick (View v){
27 Log.d(ClassName+"::"+MethodName, "entry");
28 }
29 });
30 }
31 }
user@River:~/HolaAndroid$


Now, if you're running the debugger you'll notice upon button click the debugger will receive a 'D/HolaAndroid::onStart( 1525): entry' message. To make our action a bit more obvious, follow line 27 with:

..
..
25 b1_.setOnClickListener(new OnClickListener() {
26 public void onClick (View v){
27 Log.d(ClassName+"::"+MethodName, "entry");
28 finish();
29 }
30 });
..
..

Now, your application will terminate when you press the button.

03 October, 2010

Hola Android -- Stage 1

I've begun my upward journey developing Android applications for my Samsung Galaxy phone. My intention is to review some of what I've learned and follow on with posts as I learn more. I'll skip the development setup as I've documented that in previous posts.

As with every good Computer Science example, we'll begin with the infamous 'hello world'.

Our target, a simple application that prints 'hello world' to the screen. Slowly I intend on building on it with no clear final destination than playing with features as they present themselves.

Assuming you've got your Android development environment properly set up we embark by creating a new project:

user@River:~$ ./android-sdk-linux_86/tools/android create project --package com.example.holaandroid --activity HolaAndroid --target 2 --path ~/HolaAndroidCreated project directory: /home/user/HolaAndroid
Created directory /home/user/HolaAndroid/src/com/example/holaandroid
Added file /home/user/HolaAndroid/src/com/example/holaandroid/HolaAndroid.java
Created directory /home/user/HolaAndroid/res
Created directory /home/user/HolaAndroid/bin
Created directory /home/user/HolaAndroid/libs
Created directory /home/user/HolaAndroid/res/values
Added file /home/user/HolaAndroid/res/values/strings.xml
Created directory /home/user/HolaAndroid/res/layout
Added file /home/user/HolaAndroid/res/layout/main.xml
Added file /home/user/HolaAndroid/AndroidManifest.xml
Added file /home/user/HolaAndroid/build.xml
user@River:~$


Now we've got a nice clean project directory structure that looks like the following:

user@River:~$ cd HolaAndroid/
user@River:~/HolaAndroid$ find .
.
./build.xml
./bin
./default.properties
./libs
./build.properties
./AndroidManifest.xml
./local.properties
./res
./res/values
./res/values/strings.xml
./res/layout
./res/layout/main.xml
./src
./src/com
./src/com/example
./src/com/example/holaandroid
./src/com/example/holaandroid/HolaAndroid.java
user@River:~/HolaAndroid$


Since I don't utilize the Eclipse development environment (personal choice) I authored a Makefile to ease some of the routine tasks.

user@River:~/HolaAndroid$ cat Makefile
all:
ant debug

setup:
emulator -avd myAvd &
xterm -e "adb logcat" &

run:
adb install -r ./bin/HolaAndroid-debug.apk
adb shell am start -a android.intent.action.HolaAndroid -n com.example.holaandroid/com.example.holaandroid.HolaAndroid

clean:
adb shell rm data/app/com.example.holaandroid.apk
ant clean
user@River:~/HolaAndroid$


Attempting to build the application by issuing a 'make' command and you'll be met with success.

user@River:~/HolaAndroid$ make
ant debug
Buildfile: build.xml
[setup] Android SDK Tools Revision 6
[setup] Project Target: Android 1.5
[setup] API level: 3
[setup] WARNING: No minSdkVersion value set. Application will install on all Android versions.
[setup] Importing rules file: platforms/android-3/ant/ant_rules_r2.xml

-compile-tested-if-test:

-dirs:
[echo] Creating output directories if needed...
[mkdir] Created dir: /home/user/HolaAndroid/gen
[mkdir] Created dir: /home/user/HolaAndroid/bin
[mkdir] Created dir: /home/user/HolaAndroid/bin/classes

-resource-src:
[echo] Generating R.java / Manifest.java from the resources...

-aidl:
[echo] Compiling aidl files into Java classes...

compile:
[javac] Compiling 2 source files to /home/user/HolaAndroid/bin/classes

-dex:
[echo] Converting compiled files and external libraries into /home/user/HolaAndroid/bin/classes.dex...

-package-resources:
[echo] Packaging resources
[aaptexec] Creating full resource package...

-package-debug-sign:
[apkbuilder] Creating HolaAndroid-debug-unaligned.apk and signing it with a debug key...
[apkbuilder] Using keystore: /home/user/.android/debug.keystore

debug:
[echo] Running zip align on final apk...
[echo] Debug Package: /home/user/HolaAndroid/bin/HolaAndroid-debug.apk

BUILD SUCCESSFUL
Total time: 2 seconds


Running it and you'll get

user@River:~/HolaAndroid$ make run
adb install -r ./bin/HolaAndroid-debug.apk
99 KB/s (4385 bytes in 0.043s)
pkg: /data/local/tmp/HolaAndroid-debug.apk
Success
adb shell am start -a android.intent.action.HolaAndroid -n com.example.holaandroid/com.example.holaandroid.HolaAndroid
Starting: Intent { act=android.intent.action.HolaAndroid cmp=com.example.holaandroid/.HolaAndroid }
user@River:~/HolaAndroid$


Just about every Android introduction tutorial demonstrates this, but now you've got another.

Cheers.