Showing posts with label example. Show all posts

04 April, 2014

Generating Real-Time Plots with Python

In my previous post we described plotting data using MatplotLib utilities and Python.  While this may be valuable, it becomes notably more valuable when you can generate 'live' plots during run-time.  In a past employment I worked with a series of controls engineers that utilized real-time data plots to debug and develop a highly complex multi-axis weapons system and it was the first time I understood how a real-time plot of sequence of steps simplified the development effort.

Let's get started.
Unlike the previous post, let's create the data and plot it as it is generated.


#!/usr/bin/python
from pylab import *;
import time;

def log(M):
  print "__(log) " + M;

def test01():
  plt.ion();
  fig=plt.figure(1);
  ax1=fig.add_subplot(111);
  l1,=ax1.plot(100,100,'r-');

  D=[];
  i=0.0;
  while (i < 50.0):
    D.append((i,sin(i)));
    T=[x[0] for x in D];
    L=[x[1] for x in D];
    l1.set_xdata(T);
    l1.set_ydata(L);
    ax1.relim();
    ax1.autoscale_view();
    plt.draw();
    i+=0.10;
    time.sleep(1/10.0);
  show(block=True);

#---main---
log("main process initializing");
test01();
log("main process terminating");

The result is a dynamically generated plot that resembles the following;

Tie this plotting routine to a system providing run-time information via a socket, or perhaps monitoring network traffic via pcapture libraries and you've got yourself the foundation of a real-time data monitoring system.

Cheers.

01 April, 2014

Plotting with Python

Scripting languages are incredibly powerful, but more powerful when you can visualize the data you are processing.  In this post, we will demonstrate how to quickly plot data sets via Python.

Start with installing Python and a plotting utility known as MatplotLib;


$ sudo apt-get install python python-matplotlib 
Then, let's start with a classic plot, sin(x);


#!/usr/bin/python
from pylab import *;
import time;

def log(M):
  print "__(log) " + M;


def test00():
  D=[];
  i=0.0;
  while (i < 50.0):
    D.append((i,sin(i)));
    i+=0.10;
 
  plt.ion();
  xlabel('radians');
  ylabel('sin(x)');
  grid(True);
  plt.figure(1);
  show();
  T=[x[0] for x in D];
  L=[x[1] for x in D];
  plt.plot(T,L,'b-');
  show(block=True);

#---main---
log("main process initializing");
test00();
log("main process terminating");
The result is calculating a data set followed by plotting the data and allowing the user to manipulate the plots (e.g. zooming, panning, ...).


For more detailed features, refer to the MatlabLib site: http://matplotlib.org/contents.html

Cheers.

05 October, 2013

Google ProtoBuff + ZeroMq -- Python

In our last post, we combined ZeroMq & Google Protobuf, a combination that enables heterogeneous distributed computing systems.  The last post integrated the two using C++, this post will focus on integrating the two using Python.  In the end, we'll have an example that can communicate with the previous C++ example seamlessly.

Below is a Makefile, used to create and clean up Google Protobuf message files.


$ cat Makefile

msgs:

 ${SH} protoc -I=. --python_out=. Messages.proto


clean:

 ${RM} Messages_pb2.py


Our sender script is below, notice the change is that of the content exchanged, specifically the serialized protobuff message.


$ cat sender
#!/usr/bin/python
import zmq;
import time;
import Messages_pb2
context = zmq.Context();
pub=context.socket(zmq.PUB);
pub.bind("tcp://127.0.0.1:8000");
for i in range(0,10):
  p=Messages_pb2.Person();
  p.id=i;
  p.name="fatslowkid";
  print "iteration",i
  pub.send(p.SerializeToString());
  time.sleep(1);

The receiver;

$ cat receiver
#!/usr/bin/python
import zmq;
import time;
import Messages_pb2
context = zmq.Context();
sub=context.socket(zmq.SUB);
sub.connect("tcp://127.0.0.1:8000");
filter=""
sub.setsockopt(zmq.SUBSCRIBE, filter);
for i in range(0,20):
  print "waiting on msg"
  M=sub.recv();
  p=Messages_pb2.Person();
  p.ParseFromString(M);
  print "received",p
  print "> " + p.name;
  print p.id;

The sender/receiver can be used together, or used with the previous C++ example.

Cheers.

28 September, 2013

Google ProtoBuff + ZeroMq -- C++

In the last series of posts we demonstrated ZeroMq as a technology that supports 'sockets on steroids', supporting multiple platforms as well as multiple languages.  The examples to-date have been transmitting strings between senders and receivers.  While interesting, to effectively create a distributed heterogeneous system we need to be capable of transmitting meaningful messages, preferably complex data structures rather than just strings.  That's where Google's Protobuff comes into play: http://code.google.com/p/protobuf/

Building off our previously created Ubuntu 12.04 32-bit VM, let's start by installing the additional necessary packages;


$ sudo apt-get install libprotoc-dev

With the developer libraries installed, we can now extend our previous C++ example to transmit a ProtoBuff message.

We'll extend our Makefile to add the necessary libraries and a target (e.g. msgs) to generate the C++ files for the message.


$ cat Makefile 
CC=g++
SRCS=main.cpp Messages.pb.cc
OBJS=$(subst .cpp,.o,$(SRCS))
INCLUDES += -I.
LIBS += -lpthread -lrt -lzmq -lprotobuf
.cpp.o:
$(CC) -c $<
main: msgs ${OBJS} 
${CC} ${CFLAGS} -o $@ ${OBJS} ${LIBS}
msgs:
${SH} protoc -I. --cpp_out=. Messages.proto
clean:
${RM} ${OBJS} main *.pb.*

Oh, we should take a look at our simple Protobuff message file:

$ cat Messages.proto 
message Person {
  required int32 id=1;
  required string name=2;
}

Finally, our extended main file:

$ cat main.cpp 
#include
#include
#include
#include
#include
#include
#include "Messages.pb.h"
void* ctx=zmq_init(1);
char* EndPoint="tcp://127.0.0.1:8000";
static const int N=100;
static const int BufferSize=128;
void* sender(void*)
{
  printf("(%s:%d) running\n",__FILE__,__LINE__);
  void* pub=zmq_socket(ctx, ZMQ_PUB);
  assert(pub);
  int rc=zmq_bind(pub,EndPoint);
  assert(rc==0);
  Person p;
  p.set_name("fatslowkid");
  p.set_id(01);
  for(int i=0; i
  {
    zmq_msg_t msg;
    std::string S=p.SerializeAsString();
    char* content=(char*)S.c_str();
    int rc=zmq_msg_init_size(&msg, BufferSize);
    assert(rc==0);
    rc=zmq_msg_init_data(&msg, content, strlen(content), 0,0);
    assert(rc==0);
    rc=zmq_send(pub, &msg, 0);
    assert(rc==0);
    ::usleep(100000);
  }
}
void* receiver(void*)
{
  printf("(%s:%d) running\n",__FILE__,__LINE__);
  void* sub=zmq_socket(ctx, ZMQ_SUB);
  assert(sub);
  int rc=zmq_connect(sub,EndPoint);
  assert(rc==0);
  char* filter="";
  rc=zmq_setsockopt(sub, ZMQ_SUBSCRIBE, filter, strlen(filter));
  assert(rc==0);
  for(int i=0; i
  {
    zmq_msg_t msg;
    zmq_msg_init_size(&msg, BufferSize);
    const int rc=zmq_recv (sub, &msg, 0);
    char* content=(char*)zmq_msg_data(&msg);
    Person p;
    p.ParseFromString(content);
    printf("(%s:%d) received: '%s'\n",__FILE__,__LINE__,p.name().c_str());
    zmq_msg_close(&msg);
  }
}
int main(int argc, char* argv[])
{
  printf("(%s:%d) main process initializing\n",__FILE__,__LINE__);
  int major, minor, patch;
  zmq_version (&major, &minor, &patch);
  printf("(%s:%d) zmq version: %d.%d.%d\n",__FILE__,__LINE__,major,minor,patch);
  pthread_t rId;
  pthread_create(&rId, 0, receiver, 0);
  pthread_t sId;
  pthread_create(&sId, 0, sender, 0);
  pthread_join(rId,0);
  pthread_join(sId,0);
  printf("(%s:%d) main process terminating\n",__FILE__,__LINE__);
}

Notice that we now transmit and receive Protobuf messages, serialized as strings.  The value of this is that the serialization mechanism is multi-platform & multi-language support.

Cheers.

21 September, 2013

ZeroMq Installation -- Python

In a previous post I documented the procedure for installing ZeroMq libraries for C/C++ applications. This post will focus on installing ZeroMq for Python development.


Let's get started;

Our target installation machine is Ubuntu 12.04 64-bit Desktop edition; http://www.ubuntu.com/download/desktop.  Your mileage may vary with alternative distributions.  I'm starting with a new default installation and will work through the installation process from here on.


$ sudo apt-get install python-zmq


After the APT package handling utility is done humping package installations you should have a function, albeit dated, version to begin working with.

Let's take a look at what version we're dealing with here.


$ cat go
#!/usr/bin/python
import zmq;
print zmq.pyzmq_version()
Running this beauty will show us the version of Zmq we've got installed.

$ ./go
2.1.11
Let's continue our sandbox by creating a sender and receiver Python script as follows;

$ more sender receiver
::::::::::::::
sender
::::::::::::::
#!/usr/bin/python

import zmq;
import time;

context = zmq.Context();
pub=context.socket(zmq.PUB);
pub.bind("tcp://127.0.0.1:8000");

for i in range(0,20):
  print "iteration",i
  pub.send("some message");
  time.sleep(1);
::::::::::::::
receiver
::::::::::::::
#!/usr/bin/python

import zmq;
import time;

context = zmq.Context();
sub=context.socket(zmq.SUB);
sub.connect("tcp://127.0.0.1:8000");
filter=""
sub.setsockopt(zmq.SUBSCRIBE, filter);


for i in range(0,20):
  print "waiting on msg"
  M=sub.recv();
  print "received",M

Running these two concurrently demonstrates the message delivery from the sender to the receiver;

::::::::::::::
sender.log
::::::::::::::
iteration 0
iteration 1
iteration 2
iteration 3
iteration 4
iteration 5
iteration 6
iteration 7
iteration 8
iteration 9
iteration 10
iteration 11
iteration 12
iteration 13
iteration 14
iteration 15
iteration 16
iteration 17
iteration 18
iteration 19
::::::::::::::
receiver.log
::::::::::::::
waiting on msg
received some message
waiting on msg
received some message
waiting on msg
received some message
waiting on msg
received some message
waiting on msg
received some message
waiting on msg
received some message
waiting on msg
received some message
waiting on msg
received some message
waiting on msg
received some message
waiting on msg
received some message
waiting on msg
received some message
waiting on msg
received some message
waiting on msg
received some message
waiting on msg
received some message
waiting on msg
received some message
waiting on msg
received some message
waiting on msg
received some message
waiting on msg
received some message
waiting on msg
received some message
waiting on msg

What may be of interest you as well is that since the 'endpoint' is defined identically to the one used in the C++ example you can send messages from the Python sender script to the C++ main application.

Enjoy.

14 September, 2013

ZeroMq Installation -- C++

ZeroMq, or 0Mq if you prefer, is considered 'sockets on steroids'.  The framework is aimed at simplifying distributed communications, serves as a concurrency framework, and supports more languages than any normal mortal would ever require.
http://zeromq.org

The topic of this post will be guiding through the installation on Ubuntu 12.04 and writing enough example code to verify all is happy.  Future posts will focus on installation of alternative, and interesting, languages with the overall intent of demonstrating interoperability between the languages.

Let's get started;

Our target installation machine is Ubuntu 12.04 64-bit Desktop edition; http://www.ubuntu.com/download/desktop.  Your mileage may vary with alternative distributions.  I'm starting with a new default installation and will work through the installation process from here on.


$ sudo apt-get install libzmq-dev


After the APT package handling utility is done humping package installations you should have a function, albeit dated, version to begin working with.

While ZeroMq supports a plethora of languages, the focus of this post is on C++.  That said, we'll need to install GCC C++ compiler.


$ sudo apt-get install g++


As I said earlier, the Ubuntu repository has a fairly old version.  At time of this writing, v3.2.3 was the latest stable release but for the purposes of this post we'll continue to use this version.

Let's confirm what version we have by authoring our first C++ application and ensure we can successfully compile/link with the installed libraries.

Start with a simple Makefile;


$ cat Makefile


CC=g++


SRCS=main.cpp

OBJS=$(subst .cpp,.o,$(SRCS))

INCLUDES += -I.

LIBS += -lpthread -lrt -lzmq


.cpp.o:

 $(CC) -c $<


main: ${OBJS}

 ${CC} ${CFLAGS} -o $@ ${OBJS} ${LIBS}


clean:

 ${RM} ${OBJS} main


And now let's look as a trival main program that confirms we can compile/link with Zmq libraries;


$ cat main.cpp


#include 

#include 


int main(int argc, char* argv[])

{

  printf("(%s:%d) main process initializing\n",__FILE__,__LINE__);

  int major, minor, patch;

  zmq_version (&major, &minor, &patch);

  printf("(%s:%d) zmq version: %d.%d.%d\n",__FILE__,__LINE__,major,minor,patch);

  printf("(%s:%d) main process terminating\n",__FILE__,__LINE__);

}


Running it confirms the installed Zmq libraries are near ancient, but again ok for our short-term purposes.


$ ./main


(main.cpp:6) main process initializing

(main.cpp:6) zmq version: 2.1.11
(main.cpp:6) main process terminating

Let's extend this to make it a bit more interesting, classic sender/receiver communication model using the PUB/SUB comm model provided by ZeroMq.


$ cat main.cpp


#include 

#include 

#include 

#include 

#include 

#include 


void* ctx=zmq_init(1);

char* EndPoint="tcp://127.0.0.1:8000";

static const int N=100;

static const int BufferSize=128;


void* sender(void*)

{

  printf("(%s:%d) running\n",__FILE__,__LINE__);

  void* pub=zmq_socket(ctx, ZMQ_PUB);

  assert(pub);

  int rc=zmq_bind(pub,EndPoint);

  assert(rc==0);

  for(int i=0; i  {

    char content[BufferSize];

    sprintf(content, "message %03d",i);

    zmq_msg_t msg;

    int rc=zmq_msg_init_size(&msg, BufferSize);

    assert(rc==0);

    rc=zmq_msg_init_data(&msg, content, strlen(content), 0,0);

    assert(rc==0);

    printf("(%s:%d) sending '%s'\n",__FILE__,__LINE__,content);

    rc=zmq_send(pub, &msg, 0);

    assert(rc==0);

    ::usleep(100000);

  }

}


void* receiver(void*)

{

  printf("(%s:%d) running\n",__FILE__,__LINE__);

  void* sub=zmq_socket(ctx, ZMQ_SUB);

  assert(sub);

  int rc=zmq_connect(sub,EndPoint);

  assert(rc==0);

  char* filter="";

  rc=zmq_setsockopt(sub, ZMQ_SUBSCRIBE, filter, strlen(filter));

  assert(rc==0);

  for(int i=0; i  {

    zmq_msg_t msg;

    zmq_msg_init_size(&msg, BufferSize);

    const int rc=zmq_recv (sub, &msg, 0);

    char* content=(char*)zmq_msg_data(&msg);

    printf("(%s:%d) received: '%s'\n",__FILE__,__LINE__,content);

    zmq_msg_close(&msg);

  }

}


int main(int argc, char* argv[])

{

  printf("(%s:%d) main process initializing\n",__FILE__,__LINE__);

  int major, minor, patch;

  zmq_version (&major, &minor, &patch);

  printf("(%s:%d) zmq version: %d.%d.%d\n",__FILE__,__LINE__,major,minor,patch);


  pthread_t rId;

  pthread_create(&rId, 0, receiver, 0);


  pthread_t sId;

  pthread_create(&sId, 0, sender, 0);


  pthread_join(rId,0);

  pthread_join(sId,0);


  printf("(%s:%d) main process terminating\n",__FILE__,__LINE__);

}


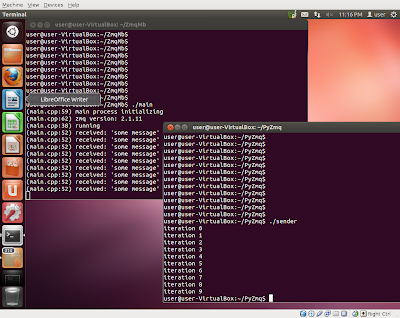
Running this beauty will result in the following;

$ cat /var/tmp/ZmqMb/main.log 
(main.cpp:59) main process initializing
(main.cpp:62) zmq version: 2.1.11
(main.cpp:15) running
(main.cpp:29) sending 'message 000'
(main.cpp:38) running
(main.cpp:29) sending 'message 001'
(main.cpp:52) received: 'message 001'
(main.cpp:29) sending 'message 002'
(main.cpp:52) received: 'message 002'
(main.cpp:29) sending 'message 003'
(main.cpp:52) received: 'message 003'
(main.cpp:29) sending 'message 004'
(main.cpp:52) received: 'message 004'
(main.cpp:29) sending 'message 005'
(main.cpp:52) received: 'message 005'
(main.cpp:29) sending 'message 006'
(main.cpp:52) received: 'message 006'
(main.cpp:29) sending 'message 007'
(main.cpp:52) received: 'message 007'
(main.cpp:29) sending 'message 008'
(main.cpp:52) received: 'message 008'
(main.cpp:29) sending 'message 009'
(main.cpp:52) received: 'message 009'
(main.cpp:29) sending 'message 010'
(main.cpp:52) received: 'message 010'
(main.cpp:29) sending 'message 011'
(main.cpp:52) received: 'message 011'


You'll notice that the first message was lost.  I've never had a sufficient understanding of why this happens, but typically the first message can be lost, primarily due to the pub/sub sockets not necessarily being fully established.  Issuing a 'sleep' between socket creation and between the receiver and sender socket usage doesn't solve the problem, it's more involved than that and I have little to offer as an explanation.

So, there you go; a simple usage of ZeroMq.

Cheers.


10 October, 2010

Hola Android -- Stage 4

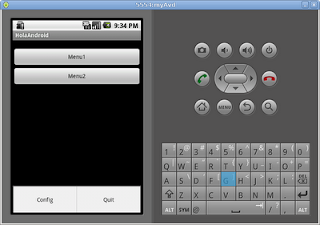
Let's expand on our user interface example by incorporating an 'icon menu' on the main activity. This menu will be activated upon pressing the 'menu button'.

Unlike the incorporation of previous menus, this addition will take place exclusively in the main activity.

We start by defining the menu items in a resource layout XML file as follows:

user@River:~/HolaAndroid$ cat -n res/layout/iconmenu.xml
1    <?xml version="1.0" encoding="utf-8"?>
2    <menu xmlns:android="http://schemas.android.com/apk/res/android">
3        <item android:id="@+id/config"
4              android:title="Config" />
5        <item android:id="@+id/quit"
6              android:title="Quit" />
7    </menu>
8
user@River:~/HolaAndroid$


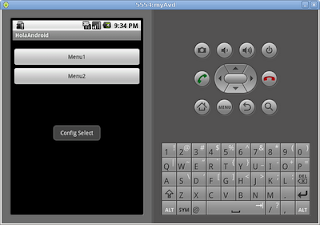
Next, we modify our HolaAndroid.java source to include the rendering of the menu upon pressing the menu button. We're making use of the Toast utilities to demonstrate the button press. Specifically, lines 13-14 and 57-99 were introduced to get our desired behavior.


user@River:~/HolaAndroid$ cat -n src/com/example/holaandroid/HolaAndroid.java
    1 package com.example.holaandroid;
    2 
    3 import android.app.Activity;
    4 import android.os.Bundle;
    5 import android.widget.Button;
    6 import android.view.View;
    7 import android.view.View.OnClickListener;
    8 import android.util.Log;
    9 import android.content.Intent;
   10 import android.view.Menu;
   11 import android.view.MenuItem;
   12 import android.view.MenuInflater;
   13 import android.widget.Toast;
   14 import android.view.Gravity;
   15 
   16 
   17 public class HolaAndroid extends Activity
   18 {
   19     private static final String ClassName = "HolaAndroid";
   20     private Button b1_;
   21     private Button b2_;
   22 
   23     /** Called when the activity is first created. */
   24     @Override
   25     public void onCreate(Bundle savedInstanceState)
   26     {
   27         final String MethodName = "onStart";
   28 
   29         super.onCreate(savedInstanceState);
   30         setContentView(R.layout.main);
   31 
   32         b1_ = (Button)this.findViewById(R.id.button1);
   33         b1_.setOnClickListener(new OnClickListener() {
   34                 public void onClick (View v){
   35                   Log.d(ClassName+"::"+MethodName, "entry");
   36                   finish();
   37                 }
   38             });
   39         b2_ = (Button)this.findViewById(R.id.button2);
   40         b2_.setOnClickListener(new OnClickListener() {
   41                 public void onClick (View v){
   42                   Log.d(ClassName+"::"+MethodName, "entry");
   43                   createMenu2();
   44                   Log.d(ClassName+"::"+MethodName, "entry");
   45                 }
   46             });
   47     }
   48     private static final int ACTIVITY_CREATE=0;
   49     private void createMenu2() {
   50       final String MethodName = "createMenu2";
   51       Log.d(ClassName+"::"+MethodName, "entry");
   52       Intent i = new Intent(this, Menu2.class);
   53       startActivityForResult(i, ACTIVITY_CREATE);
   54       Log.d(ClassName+"::"+MethodName, "exit");
   55     }
   56 
   57     @Override
   58     public boolean onCreateOptionsMenu(Menu menu)
   59     {
   60         final String MethodName = "onCreateOptionsMenu";
   61         Log.d(ClassName+"::"+MethodName, "entry");
   62         MenuInflater inflater = getMenuInflater();
   63         inflater.inflate(R.layout.iconmenu, menu);
   64         Log.d(ClassName+"::"+MethodName, "exit");
   65         return true;
   66     }
   67 
   68     @Override
   69     public boolean onOptionsItemSelected(MenuItem item)
   70     {
   71         final String MethodName = "onOptionsItemSelected";
   72         Log.d(ClassName+"::"+MethodName, "entry");
   73         boolean retVal=false;
   74         switch (item.getItemId()) {
   75           case R.id.config:
   76               retVal=true;
   77               showMsg("Config Select");
   78             break;
   79           case R.id.quit:
   80               retVal=true;
   81               showMsg("Quit Select");
   82               finish();
   83             break;
   84         default:
   85           retVal=super.onOptionsItemSelected(item);
   86         }
   87         Log.d(ClassName+"::"+MethodName, "exit");
   88         return retVal;
   89     }
   90 
   91     private void showMsg(String msg) {
   92       final String MethodName = "showMsg";
   93       Log.d(ClassName+"::"+MethodName, "entry");
   94       Toast toast = Toast.makeText(this, msg, Toast.LENGTH_LONG);
   95       toast.setGravity(Gravity.CENTER, toast.getXOffset() / 2, toast.getYOffset() / 2);
   96       toast.show();
   97       Log.d(ClassName+"::"+MethodName, "exit");
   98     }
   99 
  100 }
user@River:~/HolaAndroid$


Make it, and run it and you'll get the following result.


07 October, 2010

Hola Android -- Stage 3

So far, we've created the equivalent of a 'Hello World' application, extended the UI to include a menu button, and bound an action with the pressing of the menu button.

Let's expand our example to include a sub-menu system. First, add the additional menu button to the res/layout/main.xml file as follows:


user@River:~/HolaAndroid$ cat -n res/layout/main.xml
<?xml version="1.0" encoding="utf-8"?>
<LinearLayout xmlns:android="http://schemas.android.com/apk/res/android"
android:orientation="vertical"
android:layout_width="fill_parent"
android:layout_height="fill_parent"
>
<TextView
android:layout_width="fill_parent"
android:layout_height="wrap_content"
/>
<Button android:id="@+id/button1"
android:layout_width="fill_parent"
android:layout_height="wrap_content"
android:layout_alignParentBottom="true"
android:text="Menu1" />
<Button android:id="@+id/button2"
android:layout_width="fill_parent"
android:layout_height="wrap_content"
android:layout_alignParentBottom="true"
android:text="Menu2" />
</LinearLayout>


Rebuilding and running and you'll get twin menu buttons, the first bound to quitting the application, the second unbound to any action.


Next, we need to bind the pressing of button 2 to an action, namely the creation and rendering of another submenu.

Let's contain the behaviors of the second menu button to a newly defined class, as follows:

user@River:~/HolaAndroid$ cat src/com/example/holaandroid/Menu2.java
package com.example.holaandroid;

import com.example.holaandroid.R;

import android.app.Activity;
import android.database.Cursor;
import android.os.Bundle;
import android.view.View;
import android.widget.Button;
import android.widget.EditText;

public class Menu2 extends Activity {
private Button addButton;
@Override
protected void onCreate(Bundle savedInstanceState) {
super.onCreate(savedInstanceState);
setContentView(R.layout.menu2);
addButton = (Button)this.findViewById(R.id.m2_button1);
}
}


Easy thing to forget, but now that we're introducing a new Activity you must define it in the manifest (line 14).

$ user@River:~HolaAndroid$ cat AndroidManifest.xml
1 <?xml version="1.0" encoding="utf-8"?>
2 <manifest xmlns:android="http://schemas.android.com/apk/res/android"
3 package="com.example.holaandroid"
4 android:versionCode="1"
5 android:versionName="1.0">
6 <application android:label="@string/app_name">
7 <activity android:name=".HolaAndroid"
8 android:label="@string/app_name">
9 <intent-filter>
10 <action android:name="android.intent.action.MAIN" />
11 <category android:name="android.intent.category.LAUNCHER" />
12 </intent-filter>
13 </activity>
14 <activity android:name=".Menu2"/>
15 </application>
16 </manifest>


Since we're referencing a button in our source code, we need to have it defined in our layout xml. Create a new XML file which defines our button as follows:

user@River:~/HolaAndroid$ cat res/layout/menu2.xml
<?xml version="1.0" encoding="utf-8"?>

<LinearLayout xmlns:android="http://schemas.android.com/apk/res/android"
android:orientation="vertical" android:layout_width="fill_parent"
android:layout_height="fill_parent">
<Button android:text="M2.Button1"
android:id="@+id/m2_button1"
android:layout_width="fill_parent"
android:layout_height="wrap_content"
android:layout_alignParentBottom ="true"/>
</LinearLayout>


The final main class follows, the updates include importing the newly relevant packages, creating a createMenu2() method and assigning the main menu button click to the generation of the submenu (lines 9-12, 18, 36-43 & 45-52).


user@River:~/HolaAndroid$ cat -n src/com/example/holaandroid/HolaAndroid.java
1 package com.example.holaandroid;
2
3 import android.app.Activity;
4 import android.os.Bundle;
5 import android.widget.Button;
6 import android.view.View;
7 import android.view.View.OnClickListener;
8 import android.util.Log;
9 import android.content.Intent;
10 import android.view.Menu;
11 import android.view.MenuItem;
12 import android.view.MenuInflater;
13
14 public class HolaAndroid extends Activity
15 {
16 private static final String ClassName = "HolaAndroid";
17 private Button b1_;
18 private Button b2_;
19
20 /** Called when the activity is first created. */
21 @Override
22 public void onCreate(Bundle savedInstanceState)
23 {
24 final String MethodName = "onStart";
25
26 super.onCreate(savedInstanceState);
27 setContentView(R.layout.main);
28
29 b1_ = (Button)this.findViewById(R.id.button1);
30 b1_.setOnClickListener(new OnClickListener() {
31 public void onClick (View v){
32 Log.d(ClassName+"::"+MethodName, "entry");
33 finish();
34 }
35 });
36 b2_ = (Button)this.findViewById(R.id.button2);
37 b2_.setOnClickListener(new OnClickListener() {
38 public void onClick (View v){
39 Log.d(ClassName+"::"+MethodName, "entry");
40 createMenu2();
41 Log.d(ClassName+"::"+MethodName, "entry");
42 }
43 });
44 }
45 private static final int ACTIVITY_CREATE=0;
46 private void createMenu2() {
47 final String MethodName = "createMenu2";
48 Log.d(ClassName+"::"+MethodName, "entry");
49 Intent i = new Intent(this, Menu2.class);
50 startActivityForResult(i, ACTIVITY_CREATE);
51 Log.d(ClassName+"::"+MethodName, "exit");
52 }
53
54 }


While you're still in a similar predicament as our previous post, namely a submenu button with no action defined, you can navigate to/from the submenu using the main button and the back keypad button.

Cheers.

05 October, 2010

Hola Android -- Stage 2

Ok, so you've got your first Android application that prints 'Hello World'; nothing to write home about.

Let's expand on it a bit and make use of some of the User Interface capabilities. First though, let's remove the printing of 'Hello World'.

If you search the code you'll find no reference to our elusive string, instead it's hiding in the resources layout definition file res/layout/main.xml.

user@River:~/HolaAndroid$ cat -n res/layout/main.xml
1 <?xml version="1.0" encoding="utf-8"?>
2 <LinearLayout xmlns:android="http://schemas.android.com/apk/res/android"
3 android:orientation="vertical"
4 android:layout_width="fill_parent"
5 android:layout_height="fill_parent"
6 >
7 <TextView
8 android:layout_width="fill_parent"
9 android:layout_height="wrap_content"
10 android:text="Hello World, HolaAndroid"
11 />
12 </LinearLayout>
13
user@River:~/HolaAndroid$


Removing line 10 and you'll now have an application that renders a blank screen. Rebuild and re-run and you'll get:

user@River:~/HolaAndroid$ vi res/layout/main.xml
user@River:~/HolaAndroid$ make
ant debug
Buildfile: build.xml
[setup] Android SDK Tools Revision 6
[setup] Project Target: Android 1.5
[setup] API level: 3
[setup] WARNING: No minSdkVersion value set. Application will install on all Android versions.
[setup] Importing rules file: platforms/android-3/ant/ant_rules_r2.xml

-compile-tested-if-test:

-dirs:
[echo] Creating output directories if needed...

-resource-src:
[echo] Generating R.java / Manifest.java from the resources...

-aidl:
[echo] Compiling aidl files into Java classes...

compile:
[javac] Compiling 1 source file to /home/user/HolaAndroid/bin/classes

-dex:
[echo] Converting compiled files and external libraries into /home/user/HolaAndroid/bin/classes.dex...

-package-resources:
[echo] Packaging resources
[aaptexec] Creating full resource package...

-package-debug-sign:
[apkbuilder] Creating HolaAndroid-debug-unaligned.apk and signing it with a debug key...
[apkbuilder] Using keystore: /home/user/.android/debug.keystore

debug:
[echo] Running zip align on final apk...
[echo] Debug Package: /home/user/HolaAndroid/bin/HolaAndroid-debug.apk

BUILD SUCCESSFUL
Total time: 1 second
user@River:~/HolaAndroid$ make run
adb install -r ./bin/HolaAndroid-debug.apk
97 KB/s (4342 bytes in 0.043s)
pkg: /data/local/tmp/HolaAndroid-debug.apk
Success
adb shell am start -a android.intent.action.HolaAndroid -n com.example.holaandroid/com.example.holaandroid.HolaAndroid
Starting: Intent { act=android.intent.action.HolaAndroid cmp=com.example.holaandroid/.HolaAndroid }
user@River:~/HolaAndroid$


Now, you can play with your screen design by editing the res/layout/main.xml file. Note below we've added lines 11-15 to add a button to the main window.

user@River:~/HolaAndroid$ cat -n res/layout/main.xml
1 <?xml version="1.0" encoding="utf-8"?>
2 <LinearLayout xmlns:android="http://schemas.android.com/apk/res/android"
3 android:orientation="vertical"
4 android:layout_width="fill_parent"
5 android:layout_height="fill_parent"
6 >
7 <TextView
8 android:layout_width="fill_parent"
9 android:layout_height="wrap_content"
10 />
11 <Button android:id="@+id/button1"
12 android:layout_width="fill_parent"
13 android:layout_height="wrap_content"
14 android:layout_alignParentBottom="true"
15 android:text="Menu1" />
16 </LinearLayout>
user@River:~/HolaAndroid$


Rebuild and run and you'll get:


Alas, while you've created a button, the button has no action associated with it. Press it as you'd like you'll never get it to do anything.

So, let's make it do something. In order to tie your newly created button to an action you'll need to edit the src/com/example/holaandroid/HolaAndroid.java source. We'll add a button member, or attribute, and assign an action method to be called on the button click.

Below is our modified source code:

user@River:~/HolaAndroid$ cat -n src/com/example/holaandroid/HolaAndroid.java
1 package com.example.holaandroid;
2
3 import android.app.Activity;
4 import android.os.Bundle;
5 import android.widget.Button;
6 import android.view.View;
7 import android.view.View.OnClickListener;
8 import android.util.Log;
9
10 public class HolaAndroid extends Activity
11 {
12 private static final String ClassName = "HolaAndroid";
13 private Button b1_;
14
15 /** Called when the activity is first created. */
16 @Override
17 public void onCreate(Bundle savedInstanceState)
18 {
19 final String MethodName = "onStart";
20
21 super.onCreate(savedInstanceState);
22 setContentView(R.layout.main);
23
24 b1_ = (Button)this.findViewById(R.id.button1);
25 b1_.setOnClickListener(new OnClickListener() {
26 public void onClick (View v){
27 Log.d(ClassName+"::"+MethodName, "entry");
28 }
29 });
30 }
31 }
user@River:~/HolaAndroid$


Now, if you're running the debugger you'll notice upon button click the debugger will receive a 'D/HolaAndroid::onStart( 1525): entry' message. To make our action a bit more obvious, follow line 27 with:

..
..
25 b1_.setOnClickListener(new OnClickListener() {
26 public void onClick (View v){
27 Log.d(ClassName+"::"+MethodName, "entry");
28 finish();
29 }
30 });
..
..

Now, your application will terminate when you press the button.

03 October, 2010

Hola Android -- Stage 1

I've begun my upward journey developing Android applications for my Samsung Galaxy phone. My intention is to review some of what I've learned and follow on with posts as I learn more. I'll skip the development setup as I've documented that in previous posts.

As with every good Computer Science example, we'll begin with the infamous 'hello world'.

Our target, a simple application that prints 'hello world' to the screen. Slowly I intend on building on it with no clear final destination than playing with features as they present themselves.

Assuming you've got your Android development environment properly set up we embark by creating a new project:

user@River:~$ ./android-sdk-linux_86/tools/android create project --package com.example.holaandroid --activity HolaAndroid --target 2 --path ~/HolaAndroidCreated project directory: /home/user/HolaAndroid
Created directory /home/user/HolaAndroid/src/com/example/holaandroid
Added file /home/user/HolaAndroid/src/com/example/holaandroid/HolaAndroid.java
Created directory /home/user/HolaAndroid/res
Created directory /home/user/HolaAndroid/bin
Created directory /home/user/HolaAndroid/libs
Created directory /home/user/HolaAndroid/res/values
Added file /home/user/HolaAndroid/res/values/strings.xml
Created directory /home/user/HolaAndroid/res/layout
Added file /home/user/HolaAndroid/res/layout/main.xml
Added file /home/user/HolaAndroid/AndroidManifest.xml
Added file /home/user/HolaAndroid/build.xml
user@River:~$


Now we've got a nice clean project directory structure that looks like the following:

user@River:~$ cd HolaAndroid/
user@River:~/HolaAndroid$ find .
.
./build.xml
./bin
./default.properties
./libs
./build.properties
./AndroidManifest.xml
./local.properties
./res
./res/values
./res/values/strings.xml
./res/layout
./res/layout/main.xml
./src
./src/com
./src/com/example
./src/com/example/holaandroid
./src/com/example/holaandroid/HolaAndroid.java
user@River:~/HolaAndroid$


Since I don't utilize the Eclipse development environment (personal choice) I authored a Makefile to ease some of the routine tasks.

user@River:~/HolaAndroid$ cat Makefile
all:
ant debug

setup:
emulator -avd myAvd &
xterm -e "adb logcat" &

run:
adb install -r ./bin/HolaAndroid-debug.apk
adb shell am start -a android.intent.action.HolaAndroid -n com.example.holaandroid/com.example.holaandroid.HolaAndroid

clean:
adb shell rm data/app/com.example.holaandroid.apk
ant clean
user@River:~/HolaAndroid$


Attempting to build the application by issuing a 'make' command and you'll be met with success.

user@River:~/HolaAndroid$ make
ant debug
Buildfile: build.xml
[setup] Android SDK Tools Revision 6
[setup] Project Target: Android 1.5
[setup] API level: 3
[setup] WARNING: No minSdkVersion value set. Application will install on all Android versions.
[setup] Importing rules file: platforms/android-3/ant/ant_rules_r2.xml

-compile-tested-if-test:

-dirs:
[echo] Creating output directories if needed...
[mkdir] Created dir: /home/user/HolaAndroid/gen
[mkdir] Created dir: /home/user/HolaAndroid/bin
[mkdir] Created dir: /home/user/HolaAndroid/bin/classes

-resource-src:
[echo] Generating R.java / Manifest.java from the resources...

-aidl:
[echo] Compiling aidl files into Java classes...

compile:
[javac] Compiling 2 source files to /home/user/HolaAndroid/bin/classes

-dex:
[echo] Converting compiled files and external libraries into /home/user/HolaAndroid/bin/classes.dex...

-package-resources:
[echo] Packaging resources
[aaptexec] Creating full resource package...

-package-debug-sign:
[apkbuilder] Creating HolaAndroid-debug-unaligned.apk and signing it with a debug key...
[apkbuilder] Using keystore: /home/user/.android/debug.keystore

debug:
[echo] Running zip align on final apk...
[echo] Debug Package: /home/user/HolaAndroid/bin/HolaAndroid-debug.apk

BUILD SUCCESSFUL
Total time: 2 seconds


Running it and you'll get

user@River:~/HolaAndroid$ make run
adb install -r ./bin/HolaAndroid-debug.apk
99 KB/s (4385 bytes in 0.043s)
pkg: /data/local/tmp/HolaAndroid-debug.apk
Success
adb shell am start -a android.intent.action.HolaAndroid -n com.example.holaandroid/com.example.holaandroid.HolaAndroid
Starting: Intent { act=android.intent.action.HolaAndroid cmp=com.example.holaandroid/.HolaAndroid }
user@River:~/HolaAndroid$


Just about every Android introduction tutorial demonstrates this, but now you've got another.

Cheers.

13 September, 2010

Journey of Android Development -- First Emulator App

Still trying to get the feel for the development environment. Much of this is likely fully integrated with Eclipse, but Eclipse is historically a resource hog. 'sides, I more of a command line kinda guy.

I authored my very first application that entails multiple buttons and debug logging. The app simply creates three buttons, registers a click handler for each and demonstrates the ability to log to the adb logfile stream.

Feel free to download it here.


You may also find the Makefile useful, which supports:
1) setting up the environment (ie. starting AVD and logcat utility)
2) rebuilding the project
3) reinstalling and remotely starting the app on the emulator
4) cleanup

The project assumes you've greated an AVD called myAVD.

Cheers.

16 July, 2010

Easing System Setup with Debian Packages

Seems like every 6 months or so I feel like reinstalling Linux on my workstation. Not because I need to, but more because I want to.

Seems as my interests wander I find the need to install loads of packages for temporary tasks, once accomplished I want to remove them. Unfortunately, I don't keep track of the packages and as a result start a-fresh periodically.

I do it often enough that it doesn't take too much time. Much of it is just the identification and reinstallation of packages I regularly use.

Authoring a system installation package that identifies all my essential packages as a dependency seems as it would minimize this effort dramatically. Since packages can define dependencies and installing it can auto-resolve and install the required dependencies seems like if we authored a faux package with dependencies on the packages I want installed we'd be right on mark.

Let's start;

Start by creating a directory.

$ mkdir ~/myPackage


Next, create the necessary control file which will identify the dependencies.

$ mkdir ~/myPackage/DEBIAN
$ edit ~/myPackage/DEBIAN/control

Populate ~/myPackage/DEBIAN/control with the following:
Package: MyPackage
Version: 1.0
Section: web
Priority: optional
Architecture: all
Essential: no
Depends: gnuplot, tcl
Pre-Depends: gnuplot
Recommends:
Suggests:
Installed-Size: 1024
Maintainer: Joe Brockmeier [jzb@dissociatedpress.net]
Conflicts: wile-e-coyote
Replaces: sam-sheepdog
Provides: acme
Description: The description can contain free-form text
describing the function of the program, what
kind of features it has, and so on.

Pay special attention to the Depends: field, it's populated with tcl and gnuplot. That means, when we install this package we ask that these dependencies are installed as well.

Next, create the package by executing the following command:

$ dpkg -b ~/myPackage /tmp/myPackage.deb


All set, now just install the package as root and you'll achieve an indirect installation of the dependencies.


# gdebi /tmp/myPackage.deb


Cheers.

16 September, 2007

Command Line Processing with Popt

General practice for writing flexible applications lend toward the ability to specify command-line arguments to tailor the behavior of your application. For instance, a common practice of specifying -v to enable a verbose mode where debugging information is echoed as your application runs. Specifying a unique port for networking applications, or enablement/disablement of an application gui are two other examples that are common. Since command line arguments can take the flavor of integer, floats, doubles, strings...the code for parsing these arguments can be far from simple. Tailoring flexible parsers every time you develop an application is labor-intensive and a waste of time if a general mechanism were available.

Lucky for us, such a mechanism does exist; namely the Popt library.

A short example of an application which uses the library follows:

1 #include
2 #include
3 #include
4
5 int main(int argc, char **argv) {
6 /* option parsing variables */
7 char ch;
8 poptContext opt_con; /* context for parsing command-line options */
9 char *extra_arg;
10 int i=0;
11 char *s="";
12 float f=0.0;
13 double d=0.0;
14 int verbose=0;
15
16 static struct poptOption options_table[] = {
17 { "integer", 'i', POPT_ARG_INT, &i, 'i', "grab an integer", "INT" },
18 { "string", 's', POPT_ARG_STRING, &s, 's', "grab a string", "STRING" },
19 { "float", 'f', POPT_ARG_FLOAT, &f, 'f', "grab a float", "FLOAT" },
20 { "double", 'd', POPT_ARG_DOUBLE, &d, 'd', "grab a double", "DOUBLE" },
21 { "verbose", 'v', POPT_ARG_NONE, NULL, 'v', "enable verbose", "" },
22 POPT_AUTOHELP
23 { NULL, 0, 0, NULL, 0 } /* end-of-list terminator */
24 };
25
26 opt_con = poptGetContext(NULL, argc, (const char **)argv, options_table, 0);
27
28 /* Now do options processing */
29 while ((ch = poptGetNextOpt(opt_con)) >= 0) {
30 printf("between while & switch: ch = %c\n", ch);
31 switch (ch) {
32 case 'i':
33 printf("handling 'i' option.\n");
34 break;
35 case 's':
36 printf("handling 's' option.\n");
37 break;
38 case 'f':
39 printf("handling 'f' option.\n");
40 break;
41 case 'd':
42 printf("handling 'd' option.\n");
43 break;
44 case 'v':
45 printf("handling 'v' option.\n");
46 verbose = 1;
47 break;
48 }
49 }
50
51 if (ch < -1) { 52 // the user specified an invalid option, tell them 53 poptPrintHelp(opt_con, stderr, 0); 54 } 55 56 /* non-option args */ 57 while (extra_arg = (char *)poptGetArg(opt_con)) { 58 printf("extra arg: %s\n", extra_arg); 59 exit(1); 60 } 61 62 63 /* cleanup */ 64 poptFreeContext(opt_con); 65 66 printf("(%s:%d) i = %d\n",__FILE__,__LINE__,i); 67 printf("(%s:%d) s = '%s'\n",__FILE__,__LINE__,s); 68 printf("(%s:%d) f = %f\n",__FILE__,__LINE__,f); 69 printf("(%s:%d) d = %lf\n",__FILE__,__LINE__,d); 70 printf("(%s:%d) v = %d\n",__FILE__,__LINE__,verbose); 71 72 73 return EXIT_SUCCESS; 74 }


You compile and link the application by:
g++ -Wall   main.o  -lpopt -o main


An added bonus of using this application is the automatic introduced interfaces for a brief and more verbose help descriptions.


~/Desktop/sourceCode/C/popt$ ./main --help
Usage: main [OPTION...]
-i, --integer=INT grab an integer
-s, --string=STRING grab a string
-f, --float=FLOAT grab a float
-d, --double=DOUBLE grab a double
-v, --verbose enable verbose

Help options:
-?, --help Show this help message
--usage Display brief usage message


~/Desktop/sourceCode/C/popt$ ./main --usage
Usage: main [-v?] [-i|--integer INT] [-s|--string STRING] [-f|--float FLOAT]
[-d|--double DOUBLE] [-v|--verbose] [-?|--help] [--usage]


The heart of the library lies with proper initialization of the popt structure which is defined as follows:

struct poptOption {
const char * longName;
char shortName;
int argInfo;
void * arg;
int val;
const char * descrip;
const char * argDescrip;
};

The ability to specify either a long or short argument name is common practice; -h or --help is a common example of this form.
The long and short forms are specified as the 1st and 2nd element in the popt structure. The 3rd and 4th specify of what type the following argument consists of as well as the address in which the value will be stored. The 6th and 7th arguments specify the argument description and argument field name which is displayed in the help and brief. The 5th field is a bit of a mystery at this time.

That's all for now.

28 August, 2007

Gprof Profiling

Profiling is a mechanism for identifying program 'hotspots', identifying where your program spends a good majority of it's time. These regions are prime candidates for optimizations, where concentration of efficiency will give you the most bang for your buck.

Profiling with Gprof consists of 3-phases: 1) compiling your application with profiling enabled, 2) executing the application to gather profiling metrics, and 3) evaluating the collected metrics.

Compiling
You first must compile your application similar to the way you normally compile it. Two additional flags must be specified however, the -pg option to enable profiling, and the -g option to introduce the debugging symbols for tracking source lines of code. Actually, the -g option is only necessary for line-by-line profiling, but for good measure I suggest specifying it regardless.

$ gcc -pg -g foo.c -o foo


Executing
You run your application in the same manner as your normally run it, specifying the same arguments, inputs, outputs, . . . What you may notice however is that the program will execute slower than normal. This is reasonable when you consider what is taking place. Profiling metrics are collected during the execution of the program. Worth noting, your executable needs to terminate in a normal fashion, by returning from the main routine or calling exit().
Immediately prior to terminating the program, an output file (gmon.out) is generated that contains the collected profiling metrics. This file will later be used in evaluating the program performance.

Evaluation
Evaluation of the results stored in the gmon.out file is the last step in our quest. Various types of reports are available from the collected profiler info, the most readily used is the flat model. This is done by executing the command:

$ gprof foo


This results in the default report, a flat model followed by the call graph. The flat model will depict the list of functions in decreasing order with respect to time spent in each function. This allows for quick evaluation of the functions that your application spends most it's time in. You may notice that two functions appear in every profile; mcount and profil, each function is part of the profiling apparatus. The time spent in both functions can be viewed as profiler overhead.

12 August, 2007

FFMpeg Video Clip Generation

Hey all,

I just published my first two videos on YouTube.

I downloaded a couple videos from our Tivo, used tivodecode to decode to Mpegs and FFMpeg to extract 30 sec clips.


$ ffmpeg -ss 600 -t 30 -i infile.mpg outfile.mpg


Will result in seeking in 10 min, encoding the next 30 seconds from infile.mpg and saving to outfile.mpg

02 August, 2007

Theora/Ogg Example

I've recently been playing with Theora for encoding video. I found few examples for encoding raw video frames, and those I found were more complicated that I wanted. Below you will find my first toe-dip in the Theora realm. It basically generates a spinning dot in the middle of the frame and encodes to video at 10 frames per sec.

Have fun.


#define _FILE_OFFSET_BITS 64

#include <stdio.h>
#include <stdlib.h>
#include <ogg h="">
#include "theora/theora.h"
#include <string.h>
#include <math.h>

static FILE *ogg_fp = NULL;
static ogg_stream_state ogg_os;
static theora_state theora_td;
static theora_info theora_ti;

static int
theora_open(const char *pathname)
{
printf("(%s:%d) out filename: %s\n",__FILE__,__LINE__,pathname);
ogg_packet op;
ogg_page og;
theora_comment tc;

ogg_fp = fopen(pathname, "wb");
if(!ogg_fp) {
fprintf(stderr, "%s: error: %s\n",
pathname, "couldn't open output file");
return 1;
}

if(ogg_stream_init(&ogg_os, rand())) {
fprintf(stderr, "%s: error: %s\n",
pathname, "couldn't create ogg stream state");
return 1;
}

if(theora_encode_init(&theora_td, &theora_ti)) {
fprintf(stderr, "%s: error: %s\n",
pathname, "couldn't initialize theora encoding");
return 1;
}

theora_encode_header(&theora_td, &op);
ogg_stream_packetin(&ogg_os, &op);
if(ogg_stream_pageout(&ogg_os, &og)) {
fwrite(og.header, og.header_len, 1, ogg_fp);
fwrite(og.body, og.body_len, 1, ogg_fp);
}

// encode a comment into the packet
theora_comment_init(&tc);
theora_encode_comment(&tc, &op);
ogg_stream_packetin(&ogg_os, &op);
if(ogg_stream_pageout(&ogg_os, &og)) {
fwrite(og.header, og.header_len, 1, ogg_fp);
fwrite(og.body, og.body_len, 1, ogg_fp);
}

theora_encode_tables(&theora_td, &op);
ogg_stream_packetin(&ogg_os, &op);
if(ogg_stream_pageout(&ogg_os, &og)) {
fwrite(og.header, og.header_len, 1, ogg_fp);
fwrite(og.body, og.body_len, 1, ogg_fp);
}

if(ogg_stream_flush(&ogg_os, &og)) {
fwrite(og.header, og.header_len, 1, ogg_fp);
fwrite(og.body, og.body_len, 1, ogg_fp);
}

return 0;
}

static int
theora_write_frame(unsigned long w, unsigned long h, unsigned char *yuv)
{
yuv_buffer yuv_buf;
ogg_packet op;
ogg_page og;

unsigned long yuv_w;
unsigned long yuv_h;

unsigned char *yuv_y;
unsigned char *yuv_u;
unsigned char *yuv_v;

unsigned int x;
unsigned int y;

/* Must hold: yuv_w >= w */
yuv_w = (w + 15) & ~15;

/* Must hold: yuv_h >= h */
yuv_h = (h + 15) & ~15;

yuv_y = malloc(yuv_w * yuv_h);
yuv_u = malloc(yuv_w * yuv_h / 4);
yuv_v = malloc(yuv_w * yuv_h / 4);

yuv_buf.y_width = yuv_w;
yuv_buf.y_height = yuv_h;
yuv_buf.y_stride = yuv_w;
yuv_buf.uv_width = yuv_w >> 1;
yuv_buf.uv_height = yuv_h >> 1;
yuv_buf.uv_stride = yuv_w >> 1;
yuv_buf.y = yuv_y;
yuv_buf.u = yuv_u;
yuv_buf.v = yuv_v;

for(y = 0; y <x =" 0;" y =" 0;" x =" 0;">> 1) + (y >> 1) * (yuv_w >> 1)] = 0;
yuv_v[(x >> 1) + (y >> 1) * (yuv_w >> 1)] = 0;
}
}

for(y = 0; y < x =" 0;" y =" 0;" x =" 0;">> 1) + (y >> 1) * (yuv_w >> 1)] =
yuv[3 * (x + y * w) + 1];
yuv_v[(x >> 1) + (y >> 1) * (yuv_w >> 1)] =
yuv[3 * (x + y * w) + 2];
}
}

if(theora_encode_YUVin(&theora_td, &yuv_buf)) {
return 1;
}

if(!theora_encode_packetout(&theora_td, 0, &op)) {
return 1;
}

ogg_stream_packetin(&ogg_os, &op);
if(ogg_stream_pageout(&ogg_os, &og)) {
fwrite(og.header, og.header_len, 1, ogg_fp);
fwrite(og.body, og.body_len, 1, ogg_fp);
}

free(yuv_y);
free(yuv_u);
free(yuv_v);

return 0;
}

static void
theora_close(void)
{
ogg_packet op;
ogg_page og;
static int theora_initialized = 0;

if (theora_initialized) {
theora_encode_packetout(&theora_td, 1, &op);
if(ogg_stream_pageout(&ogg_os, &og)) {
fwrite(og.header, og.header_len, 1, ogg_fp);
fwrite(og.body, og.body_len, 1, ogg_fp);
}

theora_info_clear(&theora_ti);
theora_clear(&theora_td);

fflush(ogg_fp);
fclose(ogg_fp);
}

ogg_stream_clear(&ogg_os);
}

int
main(int argc, char *argv[])
{
int c;
int n;
unsigned i;
const char* const outFile="foo.ogg";
const unsigned NumFrames = 512;

const unsigned Width = 640/2;
const unsigned Height = 480/2;
const int video_fps_numerator = 30;
const int video_fps_denominator = 1;
const int video_aspect_numerator = 0;
const int video_aspect_denominator = 0;
const int video_rate = 0;
const int video_quality = 63;
theora_info_init(&theora_ti);

theora_ti.width = ((Width + 15) >>4)<<4; height =" ((Height">>4)<<4; frame_width =" Width;" frame_height =" Height;" offset_x =" 0;" offset_y =" 0;" fps_numerator =" video_fps_numerator;" fps_denominator =" video_fps_denominator;" aspect_numerator =" video_aspect_numerator;" aspect_denominator =" video_aspect_denominator;" colorspace =" OC_CS_UNSPECIFIED;" pixelformat =" OC_PF_420;" target_bitrate =" video_rate;" quality =" video_quality;" dropframes_p =" 0;" quick_p =" 1;" keyframe_auto_p =" 1;" keyframe_frequency =" 64;" keyframe_frequency_force =" 64;" keyframe_data_target_bitrate =" video_rate" keyframe_mindistance =" 8;" noise_sensitivity =" 1;" i="0;" frame="" d="" of="" n="" r="255;" const="" unsigned="" char="" y="(abs(R" 2104="" g="255;" 4130="" b="255;" 802="" 4096="">> 13);
unsigned char U = (abs(R * -1214 + G * -2384 + B * 3598 + 4096 + 1048576) >> 13);
unsigned char V = (abs(R * 3598 + G * -3013 + B * -585 + 4096 + 1048576) >> 13);
// generate a frame with specified color
{
unsigned i;
for(i = 0; i < r =" 0;" g =" 0;" b =" 255;" y =" (abs(R">> 13);
unsigned char U = (abs(R * -1214 + G * -2384 + B * 3598 + 4096 + 1048576) >> 13);
unsigned char V = (abs(R * 3598 + G * -3013 + B * -585 + 4096 + 1048576) >> 13);
const unsigned cX = Width/2;
const unsigned cY = Height/2;
const unsigned Radius = 50;
static double theta = 0.0;
const unsigned x = Radius * sin(theta) + cX;
const unsigned y = Radius * cos(theta) + cY;
const unsigned k=3*(x + (Width*y));
theta -= 5.0 * 3.14159/180.0;
yuv[k] = Y;
yuv[k+1] = G;
yuv[k+2] = B;
}

if(theora_write_frame(Width, Height, yuv)) {
theora_close();
exit(1);
}
}

theora_close();
return 0;
}

05 July, 2007

Logging to SysLog

Trace logging of significant events is a fundamental method for debugging and isolating errors encountered. User warnings, pop-up notification boxes, and application-level log files are one way to go. Another; to make use of the standard system log services found on *nix systems. The remainder of this post will some brief information I've recently discovered concerning interfacing with the system log services.

The syslog system import defines the interface:


extern void syslog (int __pri, __const char *__fmt, ...)


which allows for variable-lengthed argument lists, much like printf. The interface is pretty simple, the first argument specifies a priority or type of log statement; the second, a formatted string in the same form that printf takes.

A simple C

#include <stdio.h>
#include <syslog.h>

int main(int argc, char *argv[]) {
syslog(LOG_NOTICE,"%s process started", argv[0]);
sleep(3);
syslog(LOG_NOTICE,"%s process terminating", argv[0]);
}


Compile and running this example will result in two log entries in the system logs. Determining what log will contain the log statements can be determined by 1) the log type, and 2) the /etc/syslog.conf file. Note, that the log type is defined as LOG_NOTICE, and the entry in the syslog.conf file entry;

*.=info;*.=notice;*.=warn;\
auth,authpriv.none;\
cron,daemon.none;\
mail,news.none -/var/log/messages


shows that the notice log entries will be evident in /var/log/messages.

Since the files are only accessible to superusers, logging in as root and tailing the log file should show the messages in the same manner as:

# cat /var/tmp/messages
.
.
.
Jul 5 20:30:18 riffraff syslogd 1.4.1#18: restart.
Jul 5 20:42:07 riffraff app: ./app process started
Jul 5 20:42:10 riffraff app: ./app process terminating


You can interface with the syslog service using scripts as well.

$ logger -p user.notice "hello again"
# cat /var/tmp/messages
.
.
.
Jul 5 20:42:07 riffraff app: ./app process started
Jul 5 20:42:10 riffraff app: ./app process terminating
Jul 5 21:04:06 riffraff lipeltgm: hello again


Pretty slick, huh?

15 January, 2007

Private Classes in C++

For all you object-oriented software developers using C++ out there I hope this post will be of interest.

Without getting into specifics; there are numerous occasions when an abstraction spans a single class and to preserve encapsulation you may choose to define a private class (an alternative to defining a friend class). I generally have chosen to embed the private class declaration exhaustively in the public class'es private region. Recently however I've encountered on a couple other options that I thought would be interesting to share.

Option 1
Let's start with the most straightforward method; embedding the private class in the public classes private region.


// -- file: SomeClass.h --
#ifndef SOMECLASS_H
#define SOMECLASS_H

class SomeClass {
public:
SomeClass();
virtual ~SomeClass();
protected:
private: //-- methods and private classes --
class SomePrivateClass {
public:
SomePrivateClass();
~SomePrivateClass();
void doSomethingInteresting();
protected:
private:
};
private: //-- attributes --
SomePrivateClass myPrivates_;
};

#endif

// -- file: SomeClass.cpp --
#include "SomeClass.h"
#include <stdio.h>

SomeClass::SomeClass():myPrivates_() {
myPrivates_.doSomethingInteresting();
}

SomeClass::~SomeClass() {
}

SomeClass::SomePrivateClass::SomePrivateClass() {
}

SomeClass::SomePrivateClass::~SomePrivateClass() {
}

void SomeClass::SomePrivateClass::doSomethingInteresting() {
printf("(%s:%d) doing something interesting\n",__FILE__,__LINE__);
}


One of the disadvantages of this approach is that the header file becomes quite large to accommodate the multiple class definitions. Additionally, fully declaring the private class smack dab in the middle of the private region of the public class can easily give the reviewer/maintainer a headache. Indentation is pretty much your only indicator of what class you are currently looking at. Imagine your current page shows 3 method declarations (w/ documentation) you can easily lose track of what class the methods are associated with.

Option 2
The second option is similar to option 1 in that both class declarations are defined in the header, but note that the public classes instance of the private class is no longer contained by value but instead contained by reference. Since the private class declaration is not complete prior to declaring an instance of the class the size of the private class is unknown, therefore an instance cannot be defined. A pointer to an object however is allowed because a pointer is of fixed size (oftentimes the size of an integer). As you are probably aware, pointers are evil and the definition of an unmanaged pointer is even more evil. If you don't know why pointers are evil I'd highly recommend reading Marshall Cline's FAQ. I've defined a dumb pointer solely for ease of demonstration, I'd certainly recommend a managed pointer to avoid resource leaks.


// -- file: SomeClass.h --
#ifndef SOMECLASS_H
#define SOMECLASS_H

class SomeClass {
public:
SomeClass();
virtual ~SomeClass();
protected:
private: //-- methods and private classes --
class SomePrivateClass;
private: //-- attributes --
SomePrivateClass* myPrivates_;
};

class SomeClass::SomePrivateClass {
public:
SomePrivateClass();
~SomePrivateClass();
void doSomethingInteresting();
protected:
private:
};

#endif

// -- file: SomeClass.cpp --
#include "SomeClass.h"
#include <stdio.h>

SomeClass::SomeClass():myPrivates_(new SomePrivateClass()) {
myPrivates_->doSomethingInteresting();
}

SomeClass::~SomeClass() {
}

SomeClass::SomePrivateClass::SomePrivateClass() {
}

SomeClass::SomePrivateClass::~SomePrivateClass() {
}

void SomeClass::SomePrivateClass::doSomethingInteresting() {
printf("(%s:%d) doing something interesting\n",__FILE__,__LINE__);
}


While this option eases navigation of what class you are currently looking at it still suffers from a potentially large header file. Additionally, since the private class declarations are located in the header file, changes to the private class due to implemenation changes will result in header compile-time dependencies.

Option 3
This option is similar to option 2 except the private class is fully declared and defined in the cpp file; seperating the implementation from the public interface.
This is formally known as the Pimpl Principle.


// -- file: SomeClass.h --
#ifndef SOMECLASS_H
#define SOMECLASS_H

class SomeClass {
public:
SomeClass();
virtual ~SomeClass();
protected:
private: //-- methods and private classes --
class SomePrivateClass;
private: //-- attributes --
SomePrivateClass* myPrivates_;
};

#endif

// -- file: SomeClass.h --
#ifndef SOMECLASS_H
#define SOMECLASS_H

class SomeClass {
public:
SomeClass();
virtual ~SomeClass();
protected:
private: //-- methods and private classes --
class SomePrivateClass;
private: //-- attributes --
SomePrivateClass* myPrivates_;
};

#endif

// -- file: SomeClass.cpp --
#include "SomeClass.h"
#include <stdio.h>

// note the definition of private class prior to declaration of
// instance of class
class SomeClass::SomePrivateClass {
public:
SomePrivateClass();
~SomePrivateClass();
void doSomethingInteresting();
protected:
private:
};

SomeClass::SomeClass():myPrivates_(new SomePrivateClass()) {
myPrivates_->doSomethingInteresting();
}

SomeClass::~SomeClass() {
}


// private class definitions
SomeClass::SomePrivateClass::SomePrivateClass() {
}

SomeClass::SomePrivateClass::~SomePrivateClass() {
}

void SomeClass::SomePrivateClass::doSomethingInteresting() {
printf("(%s:%d) doing something interesting\n",__FILE__,__LINE__);
}


I don't know if I strongly recommend any of these methods as of yet. I've currently discovered the latter two options and am slowly forming opinions on them. Regardless of my preferences it's nice to have options.